Lying neck extension is a mandatory exercise for professional wrestlers. Neck extensors: post-isometric relaxation of the occipital-vertebral muscles Neck extensors exercises
The rate of weight loss significantly depends on the metabolic rate. Physiologists know the fact that the metabolic rate increases during exercise. Depending on the intensity of the load, the increase in metabolic rate can reach up to 20-30%. And this means that the rate of weight loss increases by 20-30%.
But, the acceleration of metabolism caused by exercise is a temporary phenomenon. 2-3 hours after exercise, the metabolic rate will return to its previous level.
To avoid this, you can use in a simple way constant boosting of metabolism, which in recreational physical education is called prolonged (extended in time) gymnastics.
This gymnastics is to do some simple exercises during the day, every 2-3 hours, literally a few seconds.
Moreover, prolonged gymnastics is just the case when we can combine business with pleasure. We will use it not only to speed up metabolism, but also to relax, relieve stress and eliminate muscle spasms.
A muscle spasms- this is exactly what causes hypertension, osteochondrosis, myopia, migraines, vegetative-vascular dystonia and many other psychosomatic diseases.
And I want to remind you again about how our brain works.
In the subconscious, three control functions are combined into one whole: control of the muscles of the body, control of somatic functions (functions of the internal organs, hormonal system), control of consciousness through mental experiences (emotions).
There is a lot of stress in our life. But these stresses are intrapsychic, that is, they are located exclusively inside the head. There is no external visible danger. No need to run, jump, climb rocks to escape from the enemy.
But every emotion inevitably affects the muscles. In our conditions, the muscular component of emotion remains unclaimed.
Moreover, we are taught from childhood to suppress the external manifestation of our negative emotions. That is, since childhood, we have been trying to suppress the body's muscular reaction to emotion - for this we are taught to sit quietly at the table, not to run around the apartment, not to shout at recess. We tighten up and gradually the muscle tension caused by negative emotions, to which there was no proper reaction, becomes chronic.
In the human body, there are stable foci of chronic muscle tension, spasms, leading to osteochondrosis, migraines, dizziness, myopia, increased pressure, etc.
This chronic tension in the muscles, in turn, is reflected in the subconscious and a persistent focus of excitation arises there. In other words, tense muscles send information to the brain that they are tense.
The subconscious deciphers this unambiguously - since the muscles are tense, it means that we are either in a state of defense or in a state of attack. The subconscious communicates this fact to the conscious, as usual in the form of an emotion. Consciousness, having received the emotion of danger, begins to look for a reason for it - this is how our endless fears arise, we begin to be afraid of people on the street, airplanes, financial collapse, illnesses, explosions, we are annoyed and angry over trifles.
The circle, which began with the suppression of negative emotions, went through the stage of chronic muscle tension, closed again on negative emotions. This is the mechanism for the development of neurosis, which has become "a sign of our time" - in the last 50 years alone, the number of neurotic diseases throughout the world has increased 25 times. The circle in which neurosis develops is an endless process, and it arises only because stable muscle blocks (spasms) have arisen in the body. And only in this place can this circle be broken. Only getting rid of chronic muscle blocks will allow us to put our psyche, and with it our health, in order.
As long as our muscles suffer from excess tension, which we most often do not notice, because we are used to it, it is simply useless to count on mental and physical health.
Thus, in order to get rid of a negative emotion, one should not try to suppress it by willpower. The Russian physiologist P.K. Anokhin showed in numerous experiments that the inhibition of the external manifestation of an emotion leads to an increase in its two other components - psychological and somatic. In other words, the tension of such emotional arousal is shifted to internal organs and muscles, which is why there is a risk of developing psychosomatic diseases - hypertension and peptic ulcer, neurodermatitis and neurogenic asthma. In addition, a person becomes irritable, dissatisfied with himself, dissatisfied with his life.
By the way, this is a professional disease of teachers. A teacher working with naughty children is forced day after day to inhibit the external component of his emotion (his irritation) - he cannot vent his irritation on other people's children entrusted to him. Meanwhile, the strength of this emotion beats with a butt on his psyche and on his body. The consequences are not long in coming - a feeling of dissatisfaction with one's life and psychosomatic illnesses. That is why only a person who has overcome his irritability, who has learned to get rid of negative emotions, can be a teacher.
As already mentioned, all three components controlled by the subconscious (muscles, internal organs, emotions) always work synchronously and depend on each other. Therefore, if we have a negative emotion, and it is impossible to suppress it, then it is necessary to influence it through the muscles.
I want to emphasize this point again. Negative emotions - this is not evil, it is a manifestation of the instinct of self-preservation. They were invented by nature in order to ensure the urgent mobilization of all the forces of the body. When an animal is stressed, it must either flee from danger or attack the enemy, which is why muscle tension is the main and most ancient component of the subconscious reaction to an external stimulus. AND the main task emotions - automatically tighten all the muscles of a person.
But we no longer live in a shroud, do not hunt for mammoths and do not run away from saber-toothed tigers. Now most of our dangers are not in the outside world, but in our own heads - we invent them ourselves. We have a huge variety of fears that we can't run away from - the fear of public speaking, the fear of being in a car accident, the fear of saying the wrong thing, the fear of angering our boss, the fear of being late for work, etc.
But for our body, fear is a command to tighten up. We instinctively tense up, and this tension does not disappear anywhere. This is how chronic muscle blocks occur, which make us even more anxious.
There are several ways in which people are accustomed to relieving chronic muscle tension - this is massage, bath and exercise.
All this, of course, is very good, but, unfortunately, massage and bath give only a short-term effect. Sports do not lead to relaxation, but to overwork of the muscles. And, although the muscles relax due to overwork, this is usually accompanied by depression, fatigue and apathy.
To get rid of muscle blocks and relax the muscles, you need to perform a special exercise, which can be called "relaxation through tension."
The fact is that our muscles are not able to withstand excessive, super-strong stress. In this situation, a protective mechanism is activated to prevent the muscle from tearing, and the muscles of the body spontaneously and completely relax. That is, the matter is small - to create an intense, short-term, excessive tension of all the muscles of the body.
There are two ways to do this - try both and choose the one you like.
1 way - "top down".
At the first stage, we strain the muscles of the body alternately.
Tension of the muscles of the hand - squeeze your fingers into a fist with all your might.
Tension of the muscles of the forearm - to the maximum bend the hands in the wrist joint.
Tension of the muscles of the shoulder and shoulder girdle - spread your arms to the sides at shoulder level and bend them at the elbows (both elbows and shoulders should be in the same line).
Tension of the muscles of the shoulder blades - bring the shoulder blades together and from this position pull to the bottom, bending in the lower back.
Tension of the muscles of the face - frown your eyebrows, close your eyes with all your strength and bring them to the bridge of your nose, wrinkle your nose, clench your jaws and spread the corners of your mouth to the sides.
Tension of the neck muscles - imagine that you are resting your forehead against the wall with all your strength, but you cannot move it, so you will ensure that the neck muscles are tense, but the head remains motionless.
Tension of the abdominal muscles - pull in the stomach as much as possible and tighten the abdominal muscles.
Muscle tension in the buttocks - sit on a hard surface, tighten the buttocks - the body will rise a little.
Tension of the muscles of the perineum - simultaneously with muscle tension abdominals and buttocks, pull the perineum into you.
Tension of the thigh muscles - from a sitting position, stretch your legs forward at a right angle.
Tension of the muscles of the lower leg - give your feet towards yourself and a little to the center.
Tension in the muscles of the foot - bend your toes.
This exercise is taught in three stages.
At the first stage - learn to strain upper part bodies, at the second stage - lower part body, and only at the third stage we combine all this and strain all the muscles of the body at the same time.
After you learn how to strain all the muscles at the same time, try to create maximum tension in all the muscles. Mentally count to 10, trying to maintain tension at this time.
On the count of ten, relax sharply and take a deep, calm breath. Rest for a minute, concentrating on the feeling of relaxation that arises in the body.
It was at this moment that we came to the most important thing - rest and relaxation. It is at this moment that muscle blocks go away, negative emotions evaporate, and unprecedented peace and harmony reign in the soul.
Repeat the exercise at least 5-10 times a day.
Contraindications: infectious diseases, pregnancy, in cases where exercise stress prohibited by the doctor. In old age, control blood pressure.
Method 2 - "flexors - extensors".
The method consists of the following combination of tension and relaxation: we strain the flexors - rest - we strain the extensors - rest.
So, first we strain all the flexors - we clench our hands into a fist, press our hands to our chest, strain our biceps, curl up in the “embryo” position, tighten our abs, pull our legs up to the body, press our head to our chest and strain with all our strength all these muscles.
We freeze for a few seconds in the position of maximum tension, then sharply relax.
Then we do the opposite - for a few seconds we strain all the extensors as much as possible: spread the fingers, straighten the arms and strain the triceps, straighten the legs and strain the muscles of the thigh and buttocks, calf muscles, spread the shoulders back and bend in the back, tilt the head back and strain all these muscles back, neck.
Letting go of stress quickly.
Rest for a minute, relax. You can repeat this procedure of tension-relaxation several times. Do 5-10 times a day.
So, do not forget to break away from your activity every 2-3 hours and perform the above-described tensions of all the muscles of the body in any of the ways. This will help speed up the metabolism, lead to muscle relaxation and get rid of chronic spasms.
A. V. Faleev The magic of harmony
Physical education hello! Reaching for the hall good results we want to show them to others. As a rule, or a wide back. But the overall picture can be spoiled by a not at all massive neck. Notice how impressive the wrestlers look, although they do not have such a large muscle mass bodies like bodybuilders.
But a strong neck is not only an impressive appearance, but also the health of the cervical spine and the whole organism as a whole. For this reason !
I propose to briefly plunge into all the intricacies of one of the most important parts our body.
In anatomy, it is customary to divide the cervical muscles into three parts:
- Deep, responsible for the movement of the head: its tilts to the sides, back and forth, as well as rotation. They, in turn, are divided into two subgroups: lateral - remote from the axis of the spine and medial - located closer to the axis. It is this group that includes an array of muscles called the long extensors of the neck.
- Median, taking an active part in such important processes as swallowing, opening the mouth and the formation of speech. We are less interested in them than others
- Superficial, represented by only two muscles: subcutaneous cervical and sternocleidomastoid. The first one stretches the skin, protecting the saphenous veins from being squeezed. The second - rotates the head and throws it back
Which covers a whole layer of deep muscles. It is the developed upper trapezoid bundles that give the neck the shape of a cobra. This muscle is responsible for turning the head in its direction, with a unilateral contraction, and for tilting the head back. With a fixed head, the upper bundles raise the shoulder blades

Why train your neck?
- Health. Perhaps you think it's better to do one extra biceps exercise than to train your neck. Meanwhile, our cervical spine needs a reliable muscular frame.
- Safety. For fighters, you can apply the term - resilience. A strong neck will help you withstand the blows of the enemy in the ring
- imposing appearance. As a bonus, you get a serious argument in the dispute and just a powerful body part that will impress others. Well, or it just won’t stand out from the overall picture of your muscular body
Preparation and warm-up
Before any workout, you need to warm up the muscles. For the cervical region, this is especially important, because any injuries can affect the quality of life.
If you already have problems with your neck, then you need to take this fact into account when drawing up training program. Forget about dynamic exercises using additional weights. But static loads will be just right. But more on that later.
Warm up:
- Head tilts to the sides and back and forth. You can divide the movement into two parts, or you can combine it into one exercise. Before starting, lightly massage your neck with your hands.
- Head turns. Stand up straight, straighten your back. Look forward and tuck your chin in slightly. Gently turn first in one direction, until you feel a slight stretching of the muscles, and then in the other
- Tilt the chin to the chest. Good movement for stretching deep muscles neck. All you need to do is to gently reach your chin to the jugular fossa (the hollow above the sternum).

Perform 5-10 repetitions of each movement, after that you can proceed to the main workout.
How to pump up the neck at home?
You don't have to go to the gym to get a healthy neck. After all, you may not need anything at all!
Let's start with gymnastics, which can be performed by both an unprepared healthy person and those who have problems with the cervical spine. But for the last group of people, I would recommend that you first contact a specialist and get the go-ahead for training!
Complex static exercises at home:
- Rest your palms on your forehead. Now try to tilt your head forward, overcoming the resistance of your hands. It is important that the neck and head do not move at the same time, since we are working in static. Start with 3-4 sets of 5-10 seconds each. Over time, increase the muscle tension time to 15-20 seconds and increase the strength of the resistance
- Grasp the back of your head with your hands and perform a similar movement. But now you need to try to throw your head back. Try to do the same number of sets as in the first exercise.
- Press the palm of your hand on the side of your head, above your ear. Try to tilt your head to the side, overcoming a stubborn palm. After completing 3-4 sets for one side, repeat the same for the other side.

When making this or that movement, you need not to move your neck towards the resisting hand, but to turn it. That is, try to perform a rotational movement of the head! This complex will not significantly affect muscle volumes, but will help to effectively strengthen the corresponding section of the spine!
Dynamic exercises:
This is the next level. For those who do not have diseases or injuries of the cervical spine.
- Take the previous exercises and perform them not in a static mode, but with a movement of the head
- Another option is to use a towel. Fold it in half and grasp the two ends firmly in your hands. You will get a loop that you need to throw over your head (not around your neck). And do all the same exercises
Easily? Find a partner. Now let him take a towel and use it to apply a load to your head. These exercises are enough if your goal is to strengthen the muscles and give them an expressive look.
Weight training
Currently, there are many different equipment that can be used for training.
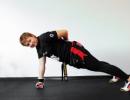
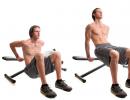
- . Among the fighters there is such a popular exercise as the wrestling bridge. With the help of TPX loops, you can make an easier version of this exercise! Take the loops in your hands and interlace your fingers in the lock. Rest your forehead on the back of your hands. Take a position so that your body is slightly tilted forward and has only two points of support: the feet resting on the floor and the forehead resting on the back of the palms. In the starting position, the whole body is stretched into a "string". The cervical spine has a natural deflection. Gently tilt your head forward, then return to the starting position. Do 2-3 sets of 10-15 reps. As your fitness increases, increase the forward lean. Similarly, you can tilt to the sides and tilt your head back.
- With disk. All you need is a pancake with a value of 5 to 20 kg and a towel. Lie down on a bench press with your head and neck out of the bench. If you are going to do an exercise on the muscles that extend or flex the head and neck, then place the disk on the back of the head or forehead, respectively. For side bends, place the plate on the area above the ear.

- With head helmet. Of course, you can avoid the inconvenience of the “pancake + towel” design. But for this you will have to purchase a harness.

The best way to do this exercise is to sit on a bench. To load the extensor muscles, lean forward with your whole body, and rest your hands on your hips. By taking the “lying on your side” position, you will pump the muscles responsible for tilting your head to the side. And if you lie on your back, you can give a load to the nodding (tilting your head forward) muscles. Since the harness is a special device for training the muscles of the neck, it allows you to accentuate the muscles.

Using relatively large weights, you can achieve significant results in increasing the strength and volume of muscles. But keep in mind that the neck is a rather vulnerable organ and it is worth training it with increased caution.
Use weights in exercises that will allow you to perform 10-12 repetitions with the most correct technique!
You can learn more about the basic rules and exercises for training the neck at home in the following video.
Weightless training
The US Association of Trainers has a universal training methodology. It includes three basic exercises. One of them we already know, lateral flexion of the neck with a harness. The other two I will present below:
- Direct wrestling bridge. All of you probably did at school on the physical bridge. So, the wrestling version is performed without hands. The head acts as a fulcrum.
Use your hands to help yourself to the starting position. The head should be slightly tilted back. Once in the correct position, remove your hands. Then begin to smoothly roll towards the legs, thereby increasing the load on the extensor muscles of the neck.

- Reverse wrestling bridge. This exercise must be supplemented with a regular wrestling bridge to maintain balance in the development of the neck muscles. Indeed, in this performance, the exercise trains the front neck muscles. Due to the complexity and injury risk of the exercises, I recommend performing them only under the supervision of an experienced trainer.

Shaking the neck in the hall
In the hall, in addition to such devices as TPX loops and harness, you can use a special simulator.

Let's see how to use this simulator for pumping the front and back of the neck.
- Exercises on back muscles. Sit in the simulator with your back to the roller. Adjust it in height so that it rests on the back of your head. Slowly take your head back, overcoming the resistance of the roller. Then also slowly return to the starting position. Do 2-3 sets of 10-12 reps.
As additional exercises, you can use extensions with a disc or harness. - Exercises for the nodding muscles. Now turn your face to the roller and rest your forehead on it. Tilt your head forward, overcoming the burden, then return to the starting position. Again, 2-3 sets of 10-12 repetitions will be enough. To diversify the workout, do 1-2 sets in the TPX loops.
- Trapeze exercises. Everything here is classic. Only shrugs, only hardcore.

With what weight to perform the movement, you choose. This can be dumbbells, barbells, weights or a special simulator. The main thing is to do 2-3 sets of 10-15 reps
- Deltoid exercises. . So give them enough attention! The best movement for the shoulders are leads.

In second place is the broach or pull of the bar to the chin.

And only on the third presses.

Why is that? Because the shape of the shoulders is formed precisely by the developed middle beams of the deltas, and they receive the maximum load in the first two exercises! In all movements, perform 2-3 sets of 10-15 reps.
Briefly about nutrition
So if you want to build muscle, you need to stick to a slight calorie surplus in your diet. Or as they say - eat on the mass.
But do not overdo it with excess calories, because we need to pump up the neck, not the stomach! A surplus of 200-300 kcal will be optimal!
Genetic features and inference
For any muscle group, genetics plays an important role in shaping the appearance of muscles. For example, the height of the trapezium at different people can differ significantly and the point is not in the training, but in the length of the tendons with which it is attached to the back of the head.
In addition, the length of the neck may differ. People with long neck it will be harder to build muscle.
In contact with
If your forearms are lagging behind your biceps and triceps, it's time to put them first. Blast those stubborn muscles with this arsenal of exercises and workouts!
If you are a farmer, a mechanic, a baseball player, or a handyman who does heavy manual work with your own hands, you probably do not need to read this article. Just tighten the powerful muscles of the forearm and click on another material. But if your profession does not require a firm grip, pulling, stretching or bending your wrists, then the forearms will most likely need to be given a lot of attention.
Strengthening the muscles of the forearm is important not only from an aesthetic point of view, although we have to admit that few things look cooler than muscular arms peeking out from under the sleeves of a T-shirt. Strong muscles forearms will also help you increase your grip strength in numerous exercises for all parts of the body and in large compound movements like heavy exercises for the back and. And who doesn't want to get ahead in these exercises?
Developing strong forearms, however, is more difficult than writing a three-set, 8-10-rep routine. Like calf muscles, arm muscles require integrated approach. Unless you have a genetic predisposition for powerful forearms, you will have to put in your best effort.
Forearms under the microscope
The muscle groups of this anatomical region consist of the brachioradialis muscle, which is located in the upper third of the forearm near the elbow joint, a group of small muscles of the outer surface, which are known as the extensors of the hand, and the muscles of the inner surface, which are the flexors of the hand.
In one, these muscles are very similar to the muscles of the lower leg. Unlike large skeletal muscles (quadriceps, pecs, and hamstrings), they are predominantly composed of slow-twitch muscle fibers.
Besides the fact that these muscles are very small and therefore have limited growth potential, the predominance of slow-twitch fibers makes them even more resistant to growth.
“The forearm and hand muscles are highly enduring, which indicates the predominance of type 1 and type 2a muscle fibers in them, and therefore they have to pay more attention,” says Olympian weightlifter and powerlifter Vince Kreipke.
Many argue that the grip required for numerous exercises in the form of pulling movements, deadlifts and shrugs provides sufficient stimulation of the muscles of the forearm. Vince Kreipke disagrees. In these exercises, you hold the bar isometrically, your hands are in neutral position, which means that there are practically no real movements with the brush.
“Remember that when you do isometric exercises, the adaptation of the muscles being trained is directly proportional to the angle at the joint with which the movements are made,” he says. “That's why any movement is important to perform with full amplitude. So to get a full range of forearm workouts and increase forearm volume, it's important to train with a variety of movements, and not be limited to a simple grip."
Special training for the muscles of the forearm is the recommended way to completely fatigue various muscles forearms and make sure they work through the entire range of motion. After completing any heavy upper body workout, you can do specific forearm exercises.
If you don't understand why you should never train your forearms in front of your back or biceps, try it yourself and then try to hold a heavy barbell. Chances are you won't be able to hold it long enough. For this reason, you should train your forearms after your back or biceps.

Specific training for the forearm muscles - completely exhaust the muscles of the forearm and make sure they work through the entire range of motion
It is only when you fully flex and fully extend the wrist joint that you force the small muscles of the forearm to actively work through the entire range of motion. In order to purposefully work out the flexors (muscles of the inner, or palmar, surface), flexion in the wrist joint should be performed, and the opposite movement is useful for training the extensors (muscles of the outer surface).
Kreipke says there is no need for intricate flexor and extensor exercises; simple wrist curls on the edge of a bench were effective back in Arnold's day. “You just need to make sure that the hand bends. I usually do this movement on a bench or any other point of support,” he says.
However, there is another large muscle of the forearm, located close to elbow joint- brachioradialis or brachioradialis muscle. Flexion and extension of the hand does not act on it. Although this muscle is also not involved in standard bicep curls, it can be worked out using neutral grip movements, like, and exercises with reverse grip, for example, reverse bending.
Strengthen your grip
Since we're trying to develop monstrous forearms here, it's appropriate to add some sophisticated training techniques.
To develop even more strong forearms, Kreipke overcomplicates wrist curls to add grip strengthening work to flexor training. “I like to use dumbbells and let them roll to my fingertips in the extension phase. This allows me to strengthen my grip and work my forearm flexors.”
Another way to raise the demands on forearm muscles and grip strength is to use a barbell or dumbbell with a thick bar. A standard barbell or dumbbell has an inch handle, but many lifters find that using a thicker bar forces the forearms to work harder, which creates additional incentives to increase the volume of muscles and increase strength.

Thick handles stimulate the work of both the muscles of the hand and the muscles of the forearms to a greater extent.
However, you will find that when you start using a thick bar, your grip will quickly become a weak link because you will have less mechanical advantage. This limits the amount of weight you can use, but over time, training with a thick barbell will drastically increase your grip strength when working with a standard bar!
Thick barbells and dumbbells are not in everyone gym, but accessories like the Fat Gripz can easily be wrapped around a regular barbell to more than double its thickness. Try using the Fat Gripz in both regular exercises and specific forearm exercises – palms up and palms down hand curls and extensions.
When training the muscles of the forearms, Kreipke recommends following three rules:
- Fulfill a large number of reps: 10-20, average 15 per set.
- Rest less between sets: just as much time as necessary to reduce the burning sensation in the muscles, usually less than a minute.
- Train your forearms long and hard: 60-plus reps per workout.
“The isometric tension of the muscles of the forearm during multiple pulls - provided that you do not use straps - should give a sufficient load of a high degree of intensity (when using big weights and low reps),” says Kreipke.

As with other muscle groups that are high in slow twitch muscle fibers, you can train your forearms more frequently.
“I highly recommend giving the forearm muscles a lot of work if you want to target this muscle group,” he continues. “I also recommend actively using supersets of opposing movements—palm up and palm down curls—to increase the pump. One way or another, you need to force the muscles to increase in volume in order to adapt to high loads.
As with other muscle groups that are high in slow twitch muscle fibers, you can train your forearms more frequently, up to three times a week, as long as you don't load them the night before a workout that requires a very strong grip.
Experiment with different combinations of sets, reps, and intensity building techniques to see which technique works best for you. As with calf training, there are many approaches you can take to force progress that is agonizingly slow. The effort and time spent will eventually pay off, and gradual progress will become more noticeable.
With that knowledge in your pocket, try the simple following workout after your biceps or back workout to add some serious volume to your forearm muscles.
Forearm workout program
To move to the next level of difficulty, try supersetting the last two exercises. You can also use the last set of each exercise: reduce the weight by 25% after muscle failure and continue the exercise until the next failure. Don't be afraid to increase the volume of the training load, try other techniques - or even when working with one hand - for maximum pumping of the muscles of the forearm.
What about straps?

Kreipke says that if you haven't used straps before, your grip will get stronger along with your other strengths, and you'll never need to use them. Especially if you pay enough attention to the development of forearms and grip strength.
However, some lifters understandably resort to using straps on hard days of back training or upper trapezium to better secure the projectile in their hands. The straps eliminate the possibility of the bar falling, which can be provoked by the following reasons:
- sweaty hands
- Insufficiently grooved neck surface
- Weak grip
- Fatigue of the muscles of the hand and forearm
The straps will definitely help you complete one or two extra reps that will spur you on. muscle growth in target muscle group. Of course, the downside is the lack of grip strength development, but with the plan we have developed, you can get the most out of both worlds by training your grip and forearms separately and using straps when needed.
Now head to the gym and blast your forearm muscles!
Current page: 6 (the book has a total of 11 pages) [accessible reading excerpt: 8 pages]
Font:
100% +
Impact technique
The first thing to do is to eliminate trigger points in long extensors neck. To do this, we use a ball for tennis. Let's start by massaging the area between the shoulder blade and the spine with a ball.
This should be done first near the wall, and then lying down. Simultaneously with the extensors of the back, you will also work on the rhomboid and middle trapezius.
Massage the muscles with transverse movements, up and down movements. For starters, it is better to use a softer tennis ball.
Then you can switch to a harder one. Treat the right and left sides in turn. You must work out all these areas in detail so that there are no painful areas left.
The most frequent places of trigger points that need to be worked out, see fig. 16.
It will take about a week to completely remove the soreness of this entire area.
Start by placing the ball near the wall, and to begin with, from top to bottom from the area of \u200b\u200bthe first thoracic vertebra to the area where the scapula ends (this is approximately the sixth, seventh thoracic vertebrae), you begin to push everything through them.
At first, you can do everything without movement, that is, you put pressure, shifted your body weight back, feel the pressure of the ball, feel a little soreness, then move it a little higher, to another area, then even higher.
And when you understand where it is more painful, where it is less painful, then where the pain is stronger, hold the ball.
Then you start doing various movements up and down, right and left. The entire area between the shoulder blade and the spine is pressed with a ball. Choose yourself, at what angle and at what point to influence.
After you stop feeling soreness, massaging the muscles while standing, start doing it lying down in order to eliminate trigger points that are located deeper.
We carry out the same manipulations with the ball, but lying on it. Lying on the floor or, to begin with, on the bed, we begin to influence problem area between spine and shoulder blade. It is better to use a tennis ball first, because it is softer, and gradually we begin to process the entire area - from the area of \u200b\u200bthe sixth to the first thoracic vertebra.
If you feel severe pain from the pressure of the ball, then lie on it without moving. The pain will gradually decrease. So you process the entire long extensor of the neck.
The part of the long extensor of the neck in the region of the cervical spine is very rarely damaged. More often, trigger points are located in the thoracic spine, where these muscles attach to the vertebrae and ribs.
Massage the long extensors of the neck in the region of the cervical spine with your fingers. Cross the brushes into a lock at the back of the head and with your thumbs begin to press in different parts of the long extensor of the neck, which is attached to the transverse and spinous processes of the cervical vertebrae.
Neck extensor exercisesAfter we have massaged all the long extensors of the neck, we begin to do various exercises. The most important thing in this exercise is to prevent tension and inclusion in the movement of the short extensors of the neck.
Before starting the exercises, you need to learn how to do the movement correctly, which will teach you to use the long extensors and leave the short ones relaxed.
Stand with your back against the wall, press your buttocks and shoulder blades against it. And now two very important movements. First, press your chin to your neck, as if pulling it back. Second - stretch the top of your head up. And you need to do these two movements at the same time. And together with these two movements, touch the wall with the back of your head. It is at this moment that the long unbends of the neck work without the short ones (see Fig. 17).

The exercise must be performed within a month. It is better to start with 2-3 sets of 3-5 repetitions, gradually increasing the number.
1. The first exercise is static. Pressure with the back of the head on the hands.
We cross our hands at the back of the head and, holding them, we begin to put pressure on them with the back of the head. Having created pressure, we linger in this position for 3-4 seconds and relax. And so several times. Here the extensors work simultaneously on the right and left sides.
To train them separately, you need to turn your head 45 degrees, hold your hands in the same way. Push back, hold this pressure for 3-4 seconds. Perform such actions by first turning your head to the right, then to the left.
2. The second exercise - lying on your back. It is better to start training the long extensors while lying down.
We put a pillow under the head and instead of hands you will create pressure on the pillow. All actions are the same as for the first exercise (see Fig. 18).

Advanced exercises
They should be performed only if you have already well strengthened the long extensors of the neck.
After you have done these exercises for a month, and preferably a few, begin to train the extensors of the neck, when the head is tilted forward. First, make a slight forward lean, then you can complicate the exercise by making this lean more and more. In this exercise, you train the muscle in a stretched state. This teaches her to work and not lose her tone when her head is tilted forward.
When does it happen? Very often, the head is in this position when we sit at the table and write, read, or hang out on Vkontakte or YouTube for a long time. At the same time, the head imperceptibly leans forward, and in this position the long extensors of the neck quickly get tired, because the load on them increases many times over, and the short extensors of the neck begin to overstrain.
Exercises of a high degree of difficultyYou should proceed to these exercises only when you perform the previous exercises with ease. And it is recommended to do them only with already sufficiently strong long extensors of the neck. In this exercise, you begin to train the muscles in motion.
Starting position: the head is tilted forward, the chin is pressed to the chest. Start pressing with the back of your head on your palms, overcoming the resistance of your hands. Make a movement to the position of the head, which was the starting point for the exercises of the first group.
Then tilt your head forward again and repeat this movement again.
In this exercise, as in the rest, there should be no pain and discomfort. If they appear, then the exercise should be stopped immediately. Also, take your time to increase the number of repetitions during the exercise.
Always make sure that the chin does not drop back.
With this movement, you train exactly that part of the extensors that is attached to the thoracic vertebrae and ribs. From this position, you can do exercises for both extensors at once, separately for the left, separately for the right extensor. Do 5-10 reps per exercise.
There are special block simulators for training the neck, which is worth moving on after you have done all these exercises. The disadvantage of these simulators is that the muscles begin to train only after repeating a certain number of times of the same exercise, approximately at the 10th repetition, when the muscle is already tired.
If there is instability of some vertebrae, then all these exercises will have a traumatic effect on the intervertebral joints and discs. Therefore, it is recommended to first accustom the muscle to a static load and only then give it a dynamic load.
In the halls there is another simulator, with a "hat". On it, the majority perform the exercise incorrectly: instead of long neck extensors, short ones are trained, unbending the head excessively and raising the chin. Thereby exacerbating the overstrain of the short extensor muscles.
Neck extensors are large group muscles located from the cervical to the thoracic vertebrae. They should be trained in such a way that each of these muscles fully works.
Before you start exercising this group muscles, put them in order, remove trigger points - somewhere within a week. Then we begin to perform the first group of exercises in statics. Start doing this exercise lying down, because in this position the head will not be thrown back.
This exercise is very convenient to do while driving. The same pressure with the back of your head that you did on your hands is done on the headrest of your chair. You also need to train the right and left long neck extensor separately (see Fig. 19).

Before you start doing all these exercises, you need to determine if there is a difference in the volume of the long extensors. Often the muscle on one side can be several times smaller than on the other. And in this case, you will need to train the muscle only on one side. Until the volume of the muscles becomes the same.
With weakness of the long extensors, instability in the cervical region can develop so strong that when the head is tilted forward, not only the spinal nerves, but also the spinal cord will be compressed.
And at the same time, weakness will occur in the underlying muscles: the lower back, abdomen and even legs. In this case, instability of the cervical region can provoke pain in the lower back and legs.
Thus, gradually selecting exercises for the state of your muscles, you can fully restore them.
Exercises for DRS
1. Pressure with the back of the head on the headrest of the seat in the car; lying on your back with the back of your head on a pillow.
2. The same pressure, turning the head to the left at 45 degrees and to the right.
In all exercises, the pressure must be held for 2-3 seconds. 5 repetitions in each exercise.
This exercise is convenient to do in a car at a traffic light or in traffic jams.
The pressure must be applied back. Hold it for 2-3 seconds.
You need to press the back of the head strictly back, without throwing your head back. The chin is pressed against the neck.
subclavian muscle
Often patients ask what was primary, what started it all?
Let us analyze one of the frequent cases, which will show how violations that at first glance are completely independent of each other can be interconnected.
The subclavian muscle is very easy to injure due to its small size (see Fig. 20), for example, you can simply fall on your shoulder. The main function of this muscle is to stabilize the clavicle. That is, it holds it in its place when the arm and neck move.

It would seem that such a small muscle. But her weakness causes a lot of problems. It all starts with the neck. First of all, the sternocleidomastoid muscle (GCSM) reacts to instability of the clavicle.
The movements in which it participates: with tension on one side - this is a turn of the head, with tension on both sides at once - tilting the head forward.
All of these disorders will develop gradually and may not be noticeable at first. Then they will appear under load, a person will begin to notice that the accuracy of movements is lost, and muscle fatigue will develop faster than before. There may be clicks in the joints and only then pain, already in a far advanced process. Pain appears when the mechanisms of compensation have exhausted themselves.
case from practice
In 2010, a patient came to me with complaints of limitation of movement in the left arm, pulling pains from the neck to the elbow, which appeared when the neck was turned and tilted.
By that time, I had already used muscle testing methods, as well as some osteopathic techniques, but the main methods were manual therapy methods - these are the manipulation and mobilization of the joints and the impact on muscle trigger points.
This pain, which made it impossible to turn his head, lasted for about a year, gradually intensifying. At the time of treatment, it was practically constant.
The first thing I discovered during the diagnosis was the instability of the clavicle and the resulting weakness of the sternocleidomastoid muscle. There was also compression of the fifth cervical nerve root caused by subluxation of the fifth and sixth vertebrae.
The first thing I did was turn on the subclavian muscle, eliminating trigger points in it, in order to stabilize the collarbone (see Fig. 21).

Then he found triggers in the long extensors of the neck and eliminated them too. Due to their prolonged weakness and the simultaneous weakness of the rhomboid and middle trapezium, functional blocks were formed in the upper and middle thoracic spine. There I performed manipulations on the intervertebral joints to restore their mobility.
I turned on and strengthened the long extensors before I did the main manipulation on the joint between the fifth and sixth cervical vertebrae in order to free the nerve root.
If I did the manipulation without affecting the muscles, then the effect of it would last no more than two or three hours. In order to restore mobility in the joints in which fixations had been eliminated, I prescribed exercises for the patient on previously unworked muscles.
After the first procedure, the pain decreased by 70%, and the range of motion was almost completely restored. Subsequently, during the course of treatment, the pain completely disappeared in the neck and arm, the movements were completely restored.
The muscle is prone to weakness, usually this occurs after a fall on its side, a blow to the shoulder, after injuries to the collarbone itself.
The muscle is very important, because it fixes the collarbone, and when it is weak, it begins to dangle.
This affects the sternocleidomastoid muscle: it simply cannot perform its function. And also all the muscles that are attached to the collarbone stop working (the clavicular portion is large chest muscle And deltoid).
Signs of subclavian muscle weakness:
1. Pain in the shoulder.
2. Numbness in the hand, fingers.
3. Pain in the neck when turning.
4. Different volume of neck rotation to the sides.
Before you start training a muscle, massage it for 1-2 minutes. You will find several painful areas in it, which you will work out each time before the exercise.
Subclavian muscle exerciseStanding in a doorway, press your palm on the door jamb from above with a straight hand towards your ear. During this movement, follow the correct trajectory: the movement of the hand should be towards your ear. Place your other hand on the area of \u200b\u200bthe muscle under the collarbone in order to feel how it tenses. Hold the palm pressure and muscle tension for 3-4 seconds (see fig. 22, fig. 23).


Repeat 5-10 times.
Do 3 sets.
trapezius muscle
The trapezius muscle (TM) consists of 3 parts: these are the upper, middle and lower trapezius (see Fig. 24).

The middle and lower trapezius muscles are prone to weakness, and the upper one to shortening. Often, the lower trapezium becomes so weak that it almost completely atrophies. The middle trapezius muscle performs the same function as the rhomboid muscle: it fixes the scapula. Its antagonist is the pectoralis minor muscle.
With weakness of the middle trapezius muscle, which most often occurs together with the rhomboid, the scapula moves forward. This causes a shortening of the pectoralis minor muscle, which provokes hyperkyphosis and stoop.
When the lower portion of the trapezius muscle weakens, its antagonist begins to shorten - this is the upper portion of the same muscle. The same thing happens with weakness of the latissimus dorsi.
There is another reason for the shortening of the upper trapezius muscle, which is little known, but very common. Between the clavicle and the acromial process of the scapula there is one small joint - the clavicular-acromial joint (or articulation) (see Fig. 25).

This joint must be securely fixed by muscles, well stabilized. Movement in it should not exceed the physiological volume. If instability of the acromioclavicular joint occurs, then in response to this, the upper trapezius muscle tenses, trying to hold the loose joint. But in order to do this, she needs to be in constant tension.
What can cause instability of the acromioclavicular joint? The most common causes are collarbone instability (described in the chapter on subclavian muscle for information on how to fix it), weakness of the anterior or posterior portion of the deltoid muscle, or injury to the joint itself.
In order to stabilize the joint and create conditions for its overstretched ligaments to become the desired length again, it is necessary to restore the tone and then make the anterior and posterior portion of the deltoid muscle sufficiently strong.
Often in parallel with this, a shortening of the middle portion of the deltoid muscle develops. Which, together with a tense trapezoid, limits the movement of the fascia, stretches it, and this causes headaches in the temples, parietal region.
Causes of shortening of the upper part of the trapezius muscleWeakness in the lower portion of the muscle;
Weakness in the latissimus dorsi;
Instability of the acromioclavicular joint.
How to eliminate shortening and relieve tension from the upper trapezius muscle?
First of all, for this it is necessary to strengthen the antagonists of the upper trapezium: the lower trapezius and the latissimus dorsi.
Let's start with the bottom trapezoid.
First you need to eliminate all trigger points in the attachment points in the thoracic spine and spine of the scapula. Often, weakness of the lower and middle portions of the trapezius muscle is associated with instability of the scapula. The main stabilizer of the scapula is the anterior serratus muscle. So to restore the normal function of the trapezius muscle, it will take good job serratus anterior.
After working out the trigger points, we begin to train the trapezius muscle.
If you limit yourself to just massaging the muscle and eliminating the triggers, you will find that they reappear after a while. This happens because the muscle managed to lose volume, atrophy during the time it did not work. And its volume and strength is not enough to fulfill its function. And every time the load is greater than usual, the muscle is traumatized and it is turned off from the movement.
Often, after you have made the lower trapezoid stronger, its upper part automatically relaxes and you don’t even have to do exercises to relax and stretch it.
Exercises to strengthen the lower trapezoidBefore you start training a muscle, you need to eliminate trigger points in it.
Take a tennis ball. We will massage the muscle with them. To begin with, you will do the exercise near the wall. We fix the ball in the area of the lower trapezoid, transfer the weight of the body to the ball and begin to massage the area at different angles, up and down, to the sides. At first, you will feel pain and discomfort in certain areas of the muscle, but gradually the muscle will begin to recover, and you will feel how the pain begins to go away.
The same exercise can be done lying down, but only after you stop feeling pain from standing with a ball massage. Lie down, put the ball under your back. For starters, just lie down and wait for the pain to subside. Then you can start making small movements in one direction, in the other direction. Change position, put the ball higher. You need to act until the pain in the lower and middle trapezium disappears. But this will not happen in one day. To completely eliminate all pain points, you may need about a month.
After massaging the muscles, you begin to train the lower trapezius muscle.
Exercise #1
We cross our arms at the back of the head (see Fig. 26). In this position, spread your elbows to the sides. So that the shoulder blades touch. And in this position, where they are as close as possible, bend slightly in the lower thoracic region, feeling tension in the region of the lower portion of the trapezius muscle. Perform 2 sets of 10 repetitions each.

Do the exercise slowly so that the muscle is tensed as much as possible during movement. Try not to raise your shoulders during the exercise. You should feel tension in the lower trapezium.
Exercise #2
Lie on your stomach, stretch your arms forward and spread them slightly to the sides, at about 45 degrees (see Fig. 27). Raise your thumbs up. The forehead touches the floor. Raise your arms and hold them in this position, giving a static load to your muscle. 2-3 sets of 20 seconds. Rest 30 seconds between them.

Exercise #3
In this exercise, the muscle begins to work after it is stretched.
Lie down on the edge of a bed or sofa with your arm hanging down. Turn your head towards your hand. The angle of the arm, as in the previous exercise, is 45 degrees in relation to the body (it is very important to observe it). You begin to raise your hand up, keeping this angle (see Fig. 28).

When you raise your arm to a parallel position with the floor, the posterior deltoid muscle works, the trapezius begins to load when the arm rises higher and the shoulder blade moves. At first, this exercise is very difficult to do if you do it correctly.
Gradually, after the first week of doing the exercise, when you can easily do 3 sets of 10-15 repetitions, start doing this exercise with weights.
To begin with, we take in our hand a weight of no more than 0.5 kg (dumbbell, water bottle, etc.). Gradually, when you stop feeling the load, you can increase the weight of the burden, bringing it gradually to 5 kg. Raise your hand to the point where you begin to feel tension in the lower trapezoid. The number of repetitions is from 5 to 12 times per arm, 3 sets.