How to make sports equipment with your own hands. How to make home exercise equipment yourself? Agility trainers
If you want to develop muscles, but there is no opportunity to go to the gym or purchase expensive equipment, you can make a simulator with your own hands. The process requires a minimum amount of time and money, and the result will not be inferior to purchased sports equipment in terms of training efficiency. About how to make your own gym with a set homemade simulators we will tell further.
After all, the weight of the Olympic and bumper pancakes can be the same as that of an ordinary homemade barbell with concrete pancakes. But a person is led to miracle simulators, bright colors and good advertising.
It is worth noting that nothing will work for free. You will have to spend an adequate amount of money to craft shells and trainers.
So why do it yourself if you still have to spend money? The answer is simple, you will save 10 times the amount you would spend on expensive equipment on the production of simulators.
Essential home gym equipment
It is worth giving preference to free weights. If your goals are to build a harmoniously developed strong body, then, undoubtedly, your choice should fall on the queen of power sports.
simulators
- Barbell. The bar can be made from a variety of materials, we will come to this issue later. For, you will need pancakes for the bar, it is advisable to have in pairs, at least 150 kilograms. Also for the barbell set, a W-shaped bar is required. This type of neck is necessary for pumping the hands and relieving stress from the joints.
- , it is desirable that they be collapsible, as they will take up less space.
- bench press preferably with an adjustable back. Such a bench is necessary for performing bench presses at different angles, wiring, pullovers and other exercises.
- , one of the most easily accessible simulators. Differ in ease of manufacture and availability of materials. The range of exercises is wide, so this simulator will perfectly complement the gym.
- power frame, will ensure your safety while doing squats, pulls and presses. A universal simulator, which is distinguished by its simplicity of design and stands out for its increased safety.
- roller trainer, for execution various rods. With the help of such a simulator, you can develop the broadest and triceps well.
- For need punching bag and.
Here is the list of the most necessary kit for bodybuilding and fitness support in general.
What sports equipment can be made with your own hands
If desired, you can make a fitness room. newest generation, but we will produce only the most necessary equipment.
The bar is a fairly simple simulator to manufacture. For it, you can use pipes and metal, and for pancakes, stumps, self-made concrete pancakes, metal blanks, car flywheels and everything that can sit on our neck.
For dumbbells, you can make blanks from fittings and metal pipes, pancakes from plastic bottles and concrete blanks. The main condition is to make the dumbbell collapsible.
The bench is easy to make. You can make one universal, with an adjustable angle of inclination, and the other at an angle of 45, 70, 90 degrees.
It is an affordable and not expensive product, but you will have to work with a pear. The simulator will cost a certain amount, but will last a long time.
What is needed to make
First, let's break everything down into items and inventory.
Barbell
For the manufacture of the neck, we need a metal pipe with a diameter of 30mm, thickness 6mm. The length of the neck should be from 1.6 m to 2 m.
Separators, which will separate the work surface for the grip and the place for pancakes. For separators, we need 2 strong bolts or cut out 2 pieces of a metal plate with a diameter of 50 mm. We drill the center of the plates by 30mm, and we have ready-made separators, it remains only to weld onto the pipe.
Neck locks. They are useful for firmly fixing pancakes on the bar. You can purchase 2 spring locks or take 2 pieces of pipe with a diameter of 31 mm and drill a hole in them and fix it with a bolt.
Pancakes. To make pancakes, we need to make a mold from boards and metal. For filling, we will use high-grade concrete, and reinforce with wire.
In order to make the construction of pancakes more durable and more beautiful, it will be necessary to cover the pancakes with concrete enamel, this will provide protection from moisture, and concrete dust will not fall from them.
Dumbbells
For the manufacture of dumbbells, we need: 2 pieces of pipe, molds for pancakes, locks. Manufacturing technology is the same as that of the rod. It is advisable to make everything at once.
For the bench we need: a metal square, dimensions 50x50x4. The length is only about 8.3 meters. Board dimensions 1.3 by 0.3m. It will be required for the base.
metal plate, for making petals. They are mounted on the racks of the bench and serve as holders for the barbell.
For the manufacture of a functional station in which there will be a horizontal bar and bars, we need metal for the base, pipes for the crossbars. Concrete for pouring the structure. Provided that the station will be installed on the street. It is also worth adding a crossbar at a height for attaching gymnastic rings and a punching bag.
power frame, the design is complex, requires the use of accurate drawings and a large number materials. So she should be treated separately.
Punching bag
For the manufacture of a punching bag, you will need either ordinary bags for storing cereals, or tarpaulin or tarpaulin. Dimensions for manufacturing - a height of at least 1 meter, weight must be taken into account from 40 to 60 kg. 2 metal rings that will shape the boxing bag, 4 carabiners, a chain meter and the stuffing itself. As stuffing, you can use rags, old things and sawdust.
Also, in addition to everything, you should have a welding machine and all accessories for it, cement, sand, crushed stone and a thinking head that will be responsible for the manufacturing process
Description of the manufacturing process, step by step instructions
Barbell
- For the manufacture of the rod, initially we make blanks for pancakes, cut out and knock together a shape in the form of a circle from the boards. We measure the middle and put a piece of pipe with a diameter of 32mm. We get a centered base. We trim the edges with tin and connect it with self-tapping screws. The form is ready. We make forms according to the same principle for dumbbells. You can adjust the size of the form yourself, keep in mind that what more pancake, the heavier it will be.
- Now we need to make a frame that will firmly hold our concrete. Such a frame is knitted from wire and placed on the bottom of the mold.
- To prepare high-grade durable concrete, we must mix 1 bag of high-grade cement, 2 bags of crushed stone and one and a half bags of sand. All this is diluted with water until a uniform mass is obtained and placed in molds. Align with a spatula all the irregularities and lay another layer of wire. Be sure to crush and tamp the concrete base in order to avoid the formation of cavities in the pancakes. Leave the molds until the solution is completely dry. On average it will take 3 days.
- After the concrete mortar has dried, carefully remove the pancakes from the molds, this must be done very carefully, if they do not come out, carefully beat the edges of the molds with a hammer and the pancakes can be taken out. Cover the finished pancakes with paint for concrete and leave to dry.
- Let's start making vultures. We will make 2 of them, one is a classic bench press, the second will be W-shaped. For a classic neck, we take our workpiece, grind it so that it is even and comfortable. After grinding, using a welding machine, we weld the holders at a distance of 40 cm from the edges. We will use bolts as locks. Then we drill 4 holes on these 40 cm for installing locks.
- For the manufacture of a W-shaped neck, we take a blank pipe, we clamp it in a vice and evenly bend the middle to a W shape. For a place for pancakes, we retreat 20 cm and weld the holders.
Dumbbells
The design of the dumbbell bar is made according to the same principle as the classic bar.

bench press
Here the bench for the bench will be a more complex design.
We take our raw materials, in the form of a square metal pipe, and make blanks out of it. We should consider the design and dimensions. Our segment is completely enough for manufacturing, and the drawing itself can be found on the Internet.

Punching bag
For the punching bag, we need to choose a material. Tarpaulin remains the best choice. If there is no opportunity and skills to sew the bag yourself, then it is better to give it to the atelier. It should be warned that the upper ring is not completely sewn, but put 4 gaps 1 cm long. Carabiners will be put on these gaps.
After the bag is ready, you need to start stuffing it. Density is determined individually for each person, but if you are new to the sport, then you should not stuff the bag tightly in order to avoid injury and let the brushes get used to it.

Summarizing
At the end of all the work, we get a set for developing strength, namely a barbell, a W-shaped neck, a pair of dumbbells, a bench and a pear.
According to the period of use, pancakes will last for at least 2 years, a pear with proper care and avoid exposure to a humid environment will last about 5 years. The bars and the bench are eternal.
Comparison of the cost of the material used and the cost of buying a new simulator
As a result, we spent about 10 thousand rubles on all the material, provided that we use only high-quality materials.
And now we give the average prices for new inventory:
- Barbell Olympic with a set of pancakes for 120 kg. In rubber protection, it will cost you about 50 thousand rubles.
- The price for a pair of dumbbells of 20 kg is 15,000 rubles.
- The average price of a bench for a bench press is from 5 thousand rubles.
- Punching bag from 3.5 thousand. As a result, we save more than 70 thousand rubles.
Manufacturing complexity
The complexity of manufacturing such simulators depends on your abilities and imagination. With a significant lack of skills, you can use the services of professionals. According to calculations, this may cost approximately another 10 thousand rubles, when compared with the amount for branded equipment, you can still save in the end. But if you still decide to do everything yourself, you will get a set of useful skills that will be useful in the future to expand the gym.
Safety of use
It is worth noting that even the most modern simulators can be injured. Worth remembering Golden Rule bodybuilding "There should be moderation in everything" which means, carefully work on the technique, and the weight of the weight will gradually increase by itself. Therefore, the likelihood of injury depends primarily on you.
Often, those who have already faced the problem of excess weight know how difficult it is to get rid of extra pounds. The first thing that comes to mind is strict diets and grueling workouts. But few people are willing to spend their time, health and money, because the same trips to the gym are not cheap. Is it hope for ideal forms not at all? Eat! In healthy weight loss, without leaving your home, the Lose Weight simulator will help you. With your own hands, you can independently make such a simulator at home.
What is a trainer
The idea of inventing the sensational simulator belongs to Nikolai Dolinov. This resourceful man built a structure that can easily replace and treadmill, and jogging, and even compete with going to the pool. Interestingly, the simulator not only replaces these types of loads, but also combines them together, while leveling the negative aspects associated with such physical activity. This approach helped the aforementioned inventor lose twenty kilograms in just two months. And this despite the fact that the initial weight of Nikolai Dolinov was about ninety kilograms. Agree, the result is very impressive! The most important thing is that Dolinov's "Lose Weight" simulator is easy to do with your own hands, even for those who have little idea of this process.

The Dolinov simulator itself looks like this - these are two ropes, which have a loop at each end. Attaches to a wall or doorway using the included hook. That, in fact, is all. Such a light and compact design, and the result from training is amazing.
Most likely, everyone who became interested in the invention was visited by the question: “How can you do it yourself?”. It's not as hard as it might seem at first glance. Of course, the home analogue will be somewhat different from its patented version, but it is quite suitable for effective home workouts.

How to make a Dolinov simulator yourself
To begin with, you can purchase everything you need for the simulator at the most ordinary building materials store. The purchase is quite budgetary, and you can easily make the Dolinov's "Lose Weight" simulator with your own hands.
You'll need:
- Rope. When choosing a rope for a future simulator, give preference to cables with high strength. Required length - 8 m.
- The belt is synthetic. The length of the belt should be 3 m, and its width should be about 35 mm.
- Dowel. Suitable plastic dowels - 3 pcs.
- Hooks. The hook should be 8 mm in cross section, with the ends in the form of a half ring.
- Blocks. The section of the block should be 3 cm. We need 2 blocks.
- PP pipe. Pipe length - 50 cm, internal section - 20 mm.
- Hacksaw for metal.
- Electric drill.
- Drill 8 mm wide.
That's all you need to make Dolinov's "Lose Weight" simulator with your own hands. Let's start manufacturing. Take the rope and cut it into two equal parts. It is better to singe the ends with matches or a lighter. Next, insert the ends of the rope into blocks.
The next step: you need to put the pipe on the rope. Secure the pipe with a rope, twisting it into a loop. In order for the resulting design to be durable and look more or less aesthetically pleasing, it is necessary to fasten the loop by sewing it with a dense thread. It is better to do this with a sewing machine, but since not every household machine is able to sew such a strong cable, you will most likely have to work with your hands.
In principle, the simulator is ready. It remains only to drill a hole for a screw with a half ring in a suitable place and fix the simulator on it.
It is much easier to understand the essence of the process when there is a clear example of how to make the Lose Weight simulator with your own hands. The drawings, however, are not so important, because the design is simple.

How to use the simulator
Now you can start training. Before starting, you need to do light warm-up. Several times you will be able to train on the floor in a prone position. To do this, lie on the floor, insert your arms and legs into the loops. You need to move like you are riding a bike.

Advantages of training on the Dolinov simulator
First, the short term. For classes you will need from 5 to 10 minutes. Secondly, compactness. The simulator occupies a minimum of space, it is easy to remove it if necessary. And despite the fact that you can make the "Lose Weight" simulator with your own hands.
As you can see, in order to throw excess weight and stay in shape, you do not need to exhaust yourself with ineffective diets and purchase expensive equipment. You can simply make the "Lose Weight" simulator with your own hands quickly and without leaving your home.
(7
votes, average: 3,57
out of 5)
Any person who wants to create a perfect body cannot do without a gym or exercise equipment for exercising at home, which, by the way, can be done by yourself, having drawings of exercise equipment and desire. Modern simulators are very expensive, but you can make them yourself. Of course, you can't make it the way it is in the original. After all, dozens of craftsmen, designers and doctors worked on it to make the most best trainer.
 Make a simulator at home according to drawings and diagrams
 Consider how to create your own gym inexpensively for homework. For this, some points should be taken into account. So, for example, some missing parts may have to be bought.
However, there is a positive side - if you wish, you can make inexpensive and high-quality sport equipment. So, in order to make a simulator with your own hands, the drawings of which can be found on the Internet, you should find the necessary equipment.
DIY Bubnovsky simulator
As you know, the multifunctional wellness is designed specifically to work out the muscles of the spine and joints without the use of drugs. It activates deep muscles spine, returning the previous activity. In addition, systematic training on it allows you to eliminate muscle spasm, as well as reduce spinal hernia and even eliminate it over time.
 DIY Bubnovsky simulator
 It is noteworthy that during training the body assumes a suspended position. In this state, the load on the joints and muscle groups is removed, the body is completely relaxed. Due to this, the pain syndrome disappears.
You can buy it on the official website or find drawings and make it yourself. It consists of 2 vertical frames, where each has upper and lower blocks, as well as one stationary one, and ropes with loads pass through it. For support and fixation to the frame of the trainee, special handles (short and long) are made. On the simulator, you can perform various wellness exercises. In addition, it can be installed in gym or at home.
 Barbell Rack Drawings
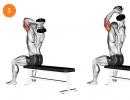
 MTB helps to maintain a toned figure by working out the main muscle groups of the body:
- abdominal and pectoral muscles.
- biceps, triceps, and delta muscles.
- gluteal and thigh muscles.
Do-it-yourself power simulator
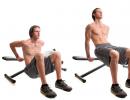
Sports equipment of any gym consists of a specific set of simulators aimed at developing certain muscle groups. Many drawings for self-assembly of power simulators are presented on various sites. Let's take an example of how to make a bench press.
To make a bench frame, you need a metal strip 4 cm wide and 4 mm thick, as well as a profile pipe 2 mm thick and a metal corner 32 mm. As a rack, you can take a 40x40 pipe to hold the weight, as well as 30x30 connectors. For a bench, you need a pipe, 40x40 in size, and for a seat with a back, a corner.
In addition, to assemble a sports simulator, you will need measuring devices, including tools for further metal processing. First, you should cut the profile frame, as well as the corner into segments and drill all the necessary holes.
Having prepared all the necessary materials, you should proceed directly to the assembly of all parts. Those connections that take on the main load during classes should be welded. The remaining parts that serve as adjustment are bolted together. After that, the priming of the structure is carried out, as well as its painting.
 Strength trainer do it yourself
 Starting the final assembly of the bench, you should prepare the supporting part of the backrest, as well as the seats, fixing them on the frame of the bench. Take 2 USB panels, the thickness of which should be 2 cm, as well as foam rubber and leather substitute for upholstery.
Thus, making a sports simulator on your own is not as difficult as it seems at first glance. The main thing is to correctly draw up a drawing diagram.
Simulator "Rule" and drawings for self-assembly
One of the ancient simulators is the rule simulator, which is still actively used by many athletes, so having a drawing, you can easily make it yourself. For manufacturing, only one rule should be followed - the angle between the legs and arms should be about 90 °.
 Simulator "Rule" and drawings for self-assembly
 To start work, the following materials are needed: cable, grips, winch, block rollers. You can fix all these details in different ways in the yard on special posts or even in the walls of the room. Such a simulator can be taken with you on a trip to nature or practice at home.
To make the simulators yourself, you will need drawings, but this simulator is easy to manufacture. When buying block rollers, you should pay attention to their quality. They must be reliable and mobile, which is especially important when making turns during classes. The cable is necessary for uniform distribution of the load and therefore must be metal.
 Make a staircase with your own hands
 Thus, you can make easy-to-use simulators or find them on various forums under the do-it-yourself section, the drawings of which are presented on their pages. At first glance, it seems that the machine is usually only able to strengthen the tendons and core muscles. However, this is only one of its main qualities. It also enhances performance internal organs, musculoskeletal system, restores strength.
 Drawings of the power simulator
 Treadmill, exercise bike and swedish wall- this is also sports equipment, but usually they take up too much space and are used not quite for their intended purpose, but more as a hanger for things. The equipment listed below takes up little space.
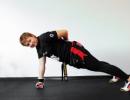
TRX
coretrainingtips.comTRX is a very convenient simulator for functional training. In addition, you can take it with you on business trips or even vacations, as it is light, takes up little space and for classes it is enough to find a strong jamb that can withstand your weight. ;)
In details:
 barabashovo.ua
 Medball is a fairly cheap simulator that does not take up much space, and therefore it can be safely stored even in a small room. The standard weight of a medicine ball is from 1 to 11 kg, but there are options that are heavier: 50, 60 and even 75 kg. The surface is usually made of dense rough rubber, which does not allow the medicine ball to slip out. The "stuffing" usually consists of sawdust, sand or a special gel.
In details:
 sportmaster.ru
 The gymnastic wheel is considered one of the best tools for working on the press. Also, in addition to the press, the muscles of the back, chest, arms and legs are included in the work.
In addition to the standard version with one wheel, there are other modifications: with two and four wheels, with a return mechanism and with a shifted center of gravity.
Video 1
Video 2
 nicebike.com
 Usually, weights are used for additional load during exercise. These can be leg weights (0.5-10 kg), hand weights (0.5-2 kg), waist weights (3-21 kg), weight vests (4-64 kg) and even gloves with weighting (mainly used to produce a sharp and strong blow).
In cheaper options, the weight is not regulated, the filler is special sand. A more expensive and high-quality option is plate weights, the weight of which can be adjusted by adding special plates (the weight of one plate is 50–400 g).
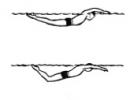
With weighting agents, they perform standard exercises that were previously performed without additional weight, run and even swim. In this case, the movements should be smooth.
It is desirable to start with a small weight and gradually increase the load. Weight can be added or removed. Reducing the weight increases the load due to the number of sets performed or due to the distance (if you run) and helps to avoid the habituation effect.
Video 1. Leg weights
Video 2. Leg weights
Video 3. Hand weights
Video 4. Weight vest
 blackroll.com.ru
 With massage rolls, exercises are not performed, but they are the salvation of tired muscles after a workout and your back after a long working day spent at the computer, so we simply could not pass by. They come in different diameters, different hardness, with a smooth or embossed surface.
Video 1. Work with the whole body
Video 2. Working with the spine
Video 3. Get rid of pain in the lower back
 shop.interatletika.com
 Classic dumbbells are solid, that is, their weight does not change. Therefore, to adjust the weights, it is better to buy a set with different weight categories. A more economical option, both in terms of money and in terms of space, are collapsible dumbbells that allow you to adjust the weight by adding or removing removable disks.
In details:
 championnet.ru
 Through the rope, of course, it is better to jump on the street. But if you are confident in the softness of your jumps or live on the ground floor or in a private house, then it may well become your home simulator. ;)
In details:
 yogastar.com
 The isotonic Pilates ring is a universal sports equipment and perfectly works out the whole body. It comes in two diameters: the female version at 35 cm and the version that is more suitable for men at 38 cm.
Video 1
Video 2
Video 3
Sandbag (sand bag)
 itf-shop.ru
 Sandbag is another sports equipment that fits perfectly into the concept home gym. Its weight ranges from 10 to 100 kg, and you can change it yourself by buying a special filler or simply going to the nearest beach for sand. The main feature of this projectile is that the sand inside is constantly moving and in order to stabilize the position of the body, you have to connect all the muscles of the body to work, even those that you might not have known existed before. ;)
Video 1. 26-minute full body workout
Video 2. 15 Sandbag Exercises
Video 3. Women's Sandbag Cardio Workout
Expander
 gripboard.com
 An expander is a sports equipment that helps to work out muscles by compressing and stretching it. There are a huge number of expanders (carpal, shoulder, tubular, tourniquets, "butterflies", skier-swimmer-boxer and multifunctional expanders), but we decided to focus on one of the simplest and most versatile - tourniquet and expander tape. It is better to work out the muscles of the arms with a tourniquet, and the tape is ideal for working on the legs.
Video 2. 10-minute workout with an expander
Video 2. Exercises for the whole body
Video 3. Exercises for the lower body
Video 4. Exercises for the upper body
Do-it-yourself dumbbells from plastic bottles are easy to make!
You can not buy expensive exercise equipment and dumbbells, but make them yourself from plastic bottles. This will require quite a bit. The source material can be found in almost every home, and the work is not very difficult, which everyone can handle. The main thing, as always, is desire.
So, to make dumbbells from plastic bottles with your own hands, you will need some material. First of all, you need plastic bottles. It will depend on the size of the finished dumbbells from plastic bottles. But usually choose two-liter bottles.
In addition to the bottles, which will be the basis for creating dumbbells with your own hands, you will also need to prepare clean river or construction sand, which will be used as a filler for bottle dumbbells.

To connect the structural elements of dumbbells, you will also need a good cork that fits tightly into the neck of the selected plastic bottles. The tighter the cork is, the better. By the way, it can be replaced with any other suitable material, for example, a wooden stick of a suitable diameter and size.
In addition, to create do-it-yourself dumbbells from plastic bottles, you need to prepare an insulating tape, good glue and scissors. Instead of scissors, you can also use a well-sharpened, sharp knife.
How to make DIY dumbbells from plastic bottles
Plastic bottles are prepared properly. They need to be washed well, peeled off labels and stickers, and then dried thoroughly. After that, they begin to create blanks.

Plastic bottle dumbbells are made from mini bottles that are made from large bottles. To do this, you need to cut upper part selected plastic bottle and its bottom. The height of the cut bottle from the top should be approximately ten or fifteen centimeters, including the neck of the plastic bottle.
The lower part is cut off so that there is a margin for gluing.
After that, both blanks are combined with each other and planted on high-quality and sufficiently strong glue. To give homemade dumbbells from plastic bottles an additional margin of safety, the connection is tightly wrapped with several layers of electrical tape.

As a result of all these manipulations, you should get a kind of mini plastic bottle, which is part of the future dumbbell. But to create dumbbells, you need to make two such bottles, so the same thing is repeated with another plastic bottle prepared in advance.
After the blanks are ready, clean river or building sand is poured into them, which gives weight to the dumbbells. Then both "mini-bottles" are connected with a tight cork. The connection is also tightly wrapped with electrical tape to give homemade dumbbells from plastic bottles more strength.

Everything - dumbbells from plastic bottles are ready and you can proceed directly to the exercises.