Front crawl - technique and training. Rowing technique Hand position at the moment of insertion
3.1. Swimming technique concept
For a more complete understanding of swimming technique, it is necessary to reveal the essence of the very concept of technique.
Motor action technique — a method of its implementation, characterized by certain parameters, such as trajectory, amplitude, frequency, voltage, etc.
Sports equipment — This is a way of performing movements (motor actions) in a given sport. The technique that is used to achieve the highest athletic results (that is, the one used by the strongest athletes in the world) is considered the most advanced. Therefore, the concept of “sports technique” is often perceived as the most rational, effective way of performing physical actions in a given sport.
Meanwhile, biomechanical analysis often reveals a number of errors in the movements of even the most highly qualified athletes. And the difference between someone who achieves high athletic results and a representative of mass sports is that the first strives for perfection of movements, and the second does not set such a task to the proper extent. However, both the first and the second can master the perfect structure of movements. In this case, they will be distinguished mainly not by the pattern of movements performed, but by speed, strength and other aspects that characterize the degree of development of motor qualities, in unity, manifested in a given sport, in a given athlete.
V.M. Dyachkov, D.D. Donskoy, V.D. Maznichenko, N.G. Ozolin understand “technique” as a separate, unified, specific movement (system of movements). L.P. Matveev believes that “technique” can be understood as a model of competitive action and as a specific method of action that actually exists in someone’s performance.
MM. Bogen believes that the authors' stance on sports technique justifies the existence of many techniques. “Exemplary” (or reference) technique is a generalized model of a rational system of movements for solving a given motor task. It would be advisable to have an individual technique for each athlete, which is an adaptation of an exemplary version to his individual characteristics. The technique can be initial, advanced, transitional, operational.
D.D. Donskoy: “Technology does not stand still, but develops... And in every period of time there is modern, that is, the most advanced technology — the most effective of the existing ones... Both accidentally and purposefully, in tens and hundreds of thousands of attempts, they are looking for new options. Main source of progress — searching for these options.”
The criterion for the rationality of sports equipment is the level of relative efficiency: specific actions of specific performers are compared, and the winner’s action is recognized as the standard.
However, winning the competition — an imperfect criterion of quality, because technique depends not only on the quality of movements. “What if there are two winners and they demonstrate different techniques? What criteria should the winner, whose technique is considered a reference in the search for further improvement, focus on?” — asks M.M. Bogen.
Therefore, the so frequently encountered concept of “ideal” technique is incorrect and can rather be applied only in emotional responses to a performer’s victory.
Constant, even minor changes in technique among leading athletes and subsequent victories in connection with this push others to copy and imitate the winner. Recently, the concept of a “model of technology” has been formulated, which is oriented towards and which is constantly being improved, i.e. it is not considered ideal, but at this stage it is the most optimal for achieving high results.
In swimming, depending on its type, technique is directly related to solving certain problems. So, when overcoming a water obstacle, and even with a possible load, — The goal is not to swim at speed, just like when doing recreational swimming.
In sport swimming, the task is to overcome a regulated distance at the highest speed in a minimum period of time. Criterion for sports performance in swimming — time.
L.P. Makarenko: “The technique of sports swimming is understood as a system of movements that allows you to realize your motor abilities into high results. The concept covers the form, character, relationship of movements, as well as the swimmer’s ability to sense and use all the forces acting on his body to move forward.”
Swimming technique — a set of rational movements with the help of which the task is most effectively solved.
The swimmer’s body is located near the surface of the water and is in a well-streamlined, close to horizontal position with an angle of attack of 2-6° (the range of the angle of attack can fluctuate within 0-8°, for highly qualified swimmers this range is more strict — 4-5°). The head is lowered into the water (face down) so that the water level is approximately at the top of the forehead. The swimmer looks forward and down under the water, casually holding his head almost strictly on the longitudinal axis.
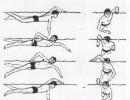
Breast crawl is characterized by alternating and symmetrical movements of the arms and legs. The swimmer's legs, rhythmically and moderately bending and unbending at the hip, knee and ankle joints, move alternately up and down, foaming the surface of the water. The working part of the leg movement is the downward kick. The most effective is a sharp blow executed from the hip. In this case, the thigh, moving down, slightly overtakes the shin-foot. The distance between the feet in the extreme lower and upper positions reaches approximately 40 cm. The toes are pulled out and turned slightly inward, the big toes are almost touching. The movements of the legs ensure a stable horizontal position of the body and maintain the speed of advancement. The arms (primarily the hands and forearms), which move along curved trajectories, provide the main forward movement of the body. During swimming, due to the work of the arms, the body rotates around the longitudinal axis of the body by 35-50°. The greatest tilt occurs at the moment of inhalation (in some cases, the rotation can increase to 60-65°). The sway of the torso strengthens the stroke and helps to carry the arm and inhale. The greatest angles of inclination are observed in the thoracic part of the body, the smallest in the lumbar and pelvic parts.
There are 3 varieties of the crawl method depending on the frequency of the legs: 2-impact, 4-impact and 6-impact, when for one cycle of arm work (2 arm strokes) there are 2, 4 or 6 kicks (see Fig. 6, 7, 8). 2- and 4-stroke crawl is used, as a rule, at medium and long distances, and 6-stroke — on sprint and finishing accelerations.
Breath.With normal breathing, one inhalation and one exhalation are performed per cycle of movements (2 strokes with the arms). To inhale, the head is turned relative to the longitudinal axis of the swimmer’s body towards the rowing hand (to the right or left) so that the mouth is above the water. Inhalation is performed quickly and actively through a wide open mouth at the beginning of raising the hand above the water when the body is tilted. After this, the head quickly turns into the water (face down) and a gradual exhalation immediately begins, first through the mouth, then through the nose. Exhalation is longer than inhalation. The respiratory cycle ends with a sharp exhalation of the remaining air through the mouth at the moment when the mouth again appears above the water - the mouth and lips are freed from the water, the swimmer is ready to begin the next inhalation. There should be no pauses between inhalation and exhalation, as well as between exhalation and inhalation.
When breathing for one cycle, the swimmer breathes under one hand - either under the left or under the right. Inhalation and exhalation can also be done every third stroke (1.5 cycles) or even every fifth stroke (2.5 cycles), thus inhaling alternately under the right and then under the left hand.
Leg movements. The legs perform continuously alternating counter movements from top to bottom and bottom to top with a small amplitude. The movements of the legs ensure a stable horizontal position of the body and maintain the speed of advancement. The movement of the legs consists of two phases - working (supporting) and preparatory (non-supporting). The downward movement of the leg (support phase) is also called a stroke, or kick (it contributes to some movement of the body forward), and the upward movement of the leg — preparatory (it does not affect the movement of the body forward). Since the movements of both legs are exactly the same, we can consider the technique using the example of the movement of one leg.
Reference (working) phase (movement from top to bottom). The downward movement of the leg begins with sequential extension at the knee and ankle (at the very end of the stroke) joints and simultaneous flexion at the hip joint. At this moment, all parts of the leg move downwards. Then the lower leg and foot continue to move downwards until the leg is fully extended at the knee joint, and the thigh, ahead of the lower leg and foot, begins to move upward. This movement of the hip helps increase the speed of the downward movement of the foot due to the whip-like motion of the leg as a whole. With this movement of the leg, the foot creates some lifting and traction forces, which help maintain the body on the surface of the water and propel it forward. The working movement is considered complete when the leg is fully straightened at the knee joint.
Preparatory phase (movement from bottom to top). In the initial (lowest position) the leg is straightened at the knee joint, and the foot is turned inward and relaxed. In relation to the body, the leg takes an inclined position, as it remains bent at the hip joint. The upward movement begins with straight leg extension at the hip joint. Until the horizontal position, the leg moves straight. Next, the leg begins to bend at the knee joint, and the lower leg and foot continue to move upward. At this moment, the thigh begins to move downward due to flexion at the hip joint. When the angle between the front surface of the thigh and the torso (at the hip joint) is 160-170°, and between the back surface of the leg and thigh (at the knee joint) — 130-140°, the movement of the leg from bottom to top is considered complete.
Coordination of footwork movements. From the extreme upper position, one leg moves down, while the other moves upward from the extreme lower position. The greatest amplitude of movements between the ankle joints is approximately 30-40 cm. It depends on the speed of swimming: at high speeds, the amplitude of movements can decrease, as the speed of movement of the feet increases, and their path (vertically) is shortened. Since the legs make continuous movements in the water and there is little movement from them, they should move freely with little effort.
When swimming the six-beat freestyle, the hip movements are performed with rapid changes of direction. In the four-beat crawl, the legs perform a crossing motion: one moves diagonally downward-inward, while the other moves smoothly upward, causing the legs to cross for a brief moment. The amplitude of such cross movements is small. In the double-stroke crawl version, the downward movement of the leg resembles an energetic sweeping stroke, as in butterfly swimming, with the active involvement of the pelvis in this movement.
Hand movements.In front crawl, the main forward movement of the body is provided by the arms (hands and forearms), which move along curved trajectories (see Fig. 7). The cycle of movements of each hand consists of the following phases:
— hand entry into water;
— capture;
— supporting part (two subphases - pulling and pushing);
— hand coming out of the water;
— raising your hand above the water.
The duration of a full cycle of hand movement is approximately 0.92-1.36 s.
As a rule, the phase composition of hand movements begins to be considered from the hand’s entry into the water, which is quite justified from visual considerations. However, the entry of the hand into the water completes the preparation for the next stroke, therefore, in some literary sources (for example, in the book by N.Zh. Bulgakov “Sport Swimming”, 1996), consideration of the technique of hand movement and phase composition begins with the next phase, so as not to violate the integrity working and preparatory periods. At the same time, the semantic content and order of alternation of the phases themselves in the cycle remain unchanged in both cases.
The phase of hand entry into the water. After being carried through the air, the arm bent at the elbow quickly enters the water at an acute angle in front of the shoulder joint of the same name, the palm is facing down and back, the fingers are connected. Immersion of the hand in water is carried out in the following sequence: hand, forearm, shoulder. The arm extends at the elbow and the grip begins.
The hand enters the water close to the longitudinal axis of the body or between it and a parallel line drawn at shoulder width. At the moment the hand touches the water, the angle of body roll to the opposite side is still 10-15°; at the moment the entry into the water is completed, it is zero.
The duration of the phase is about 0.07-0.17 s (7-12% of the time of the entire cycle).
Rice. 7
The phase is captured.In tempo variations of the freestyle it is short-lived; in variations with a long power stroke, the arm is extended more forward, as a result of which the hand and forearm interact with the flow longer. At the beginning of the grip, the hand, moving forward and down, bends slightly at the elbow joint, and the hand turns slightly with the palm outward. At this moment, the hand makes an angle with the surface of the water approximately equal to 15-20°. Moving further, the arm continues to bend at the elbow joint, and the hand, at a slight angle of attack, changing direction (downwards and inwards), moves under the longitudinal axis of the body. By the end of this phase, the hand takes the best position for performing the stroke: the angle between the horizontal and the forearm is 30-40°, the angle of flexion at the elbow joint — 120-140°, angle of attack of the hand — 40-50°.
The duration of the capture phase is approximately 0.08-0.30 s (10-25% of the time of the full cycle of movements).
Reference phase (2 subphases — pulling and pushing).
Pull-up subphase begins with a pronounced rotation of the arm inward and flexion of the forearm by gradually increasing the pressure on the wrist. The brush begins to move backward relative to the water. At the beginning of the pull-up, the arm is bent at the elbow joint to an angle of 130-150 ° , the hand is oriented to the frontal plane at an angle of about 45 ° .
Moving under the body with acceleration, the arm continues to bend at the elbow joint; forming an angle between the shoulder and forearm in the middle of the stroke equal to 90-110°. Here the hand moves from front to back in an inclined plane with simultaneous rotation of the forearm outward.
Repulsion subphase — the most energetic part of the cycle. The hand moves with acceleration under the abdomen and pelvis from front to back and slightly outward, maintaining a position close to the front. The arm is extended at the elbow joint. The swimmer, due to good support on the water, accelerates the forward movement of the body. The subphase ends with a sliding movement of the hand up and back and slightly outward, mainly due to the extension of the forearm. Optimal completion is facilitated by the beginning of the body roll to the opposite side.
The support phase ends when the arm reaches the pelvic line. At this moment, the arm (forearm and hand) moves up and back.
The duration of the main part of the stroke is 0.35-0.60 s (30-45% of the time of the entire cycle of movements).
The phase when the hand comes out of the water. The phase coincides with the roll of the body to the opposite side. When the hand reaches the thigh, active muscular efforts aimed at moving the body forward cease, and the elbow rises out of the water. At the next moment, the shoulder, forearm and hand rise out of the water in sequence and the movement (carrying) of the hand above the water begins. The brush comes out of the water behind the pelvic line, at the hip. The muscles of the forearm and hand should be relaxed if possible.
The duration of this phase is 0.05-0.08 s (5-8% of the time of the entire cycle of movements).
The phase of carrying the hand above the water. The bent arm, without undue tension, quickly sweeps over the water in the shortest possible way and enters the water. During the sweep, the elbow is in a high position and directed up and to the side, and the hand is held at the surface of the water. The movement of the arm is facilitated by the high position of the shoulder joint of the same name, which is ensured by the low position of the shoulder joint of the other arm, which is performing the beginning of the stroke at this time. The duration of the phase is 0.30-0.50 s (25-40% of the full cycle time).
Coordination of hand movements. Correct coordination of hand movements in the front crawl is based on obtaining the highest, relatively uniform speed of the swimmer's movement throughout each cycle. Therefore, the pause between the end of the main part of the stroke with one hand and the beginning of the main part of the stroke with the other hand should be such that the achieved speed of the swimmer’s movement is maintained. This depends on the continuous production of traction forces throughout the swimmer's movement cycle. Therefore, when the left hand performs the second half of the main part of the stroke, the right one at that moment enters the water and begins to capture. The removal of the left hand from the water and the beginning of the carry should coincide with the end of the grip phase of the right hand. At the moment the left hand finishes sweeping, the right hand finishes the first half of the main part of the stroke. Entering the water and starting to grab the left hand should coincide with the execution of the second half of the main part of the right hand stroke. Next, the left hand carries out the catching phase, and the right hand comes out of the water and begins the carry. The cycle of movements is completed when the left hand completes the first half of the main part of the stroke, and the right hand completes the sweep.
General coordination of movements. In front crawl, high, uniform speed is achieved due to the continuity of working movements of the arms and legs, and clear coordination of movements with breathing. The full cycle of movements consists of a stroke with the left and right hands and a certain number of kicks (two, four or six) and breathing, which, as already noted, is also variable (inhalation can be done through 2 or 3 strokes with the hands, in some cases through more number of strokes).
Let's consider the main 3 options for coordinating movements in the front crawl method, depending on the work of the legs.

Fig.8
Double-beat crawl . In a two-impact crawl (see Fig. 8), for two alternate strokes with the arms there are two successive kicks with the legs. The basis of the two-beat crawl is continuous strokes with the arms. Any delay in arm movements leads to loss of balance and body sinking, which forces the swimmer to make additional movements with his legs. The pace of arm movements at the same distance is always noticeably higher than with other options, especially with the six-beat freestyle.
I.p. — the left hand finishes the stroke (the hand is at the surface of the water), the right begins the second half of the main part of the stroke (the hand is under the chest), the left leg moves up (the foot is near the horizontal), the right is bent at the knee joint, it is at the top (the foot is at the surface of the water) .
From the starting position, the left (right) hand enters the water, performs a grab and approaches the middle of the first half of the supporting part of the stroke, the right one finishes the second half of the supporting part of the stroke, leaves the water and approaches the middle of the stroke, the left leg rises up (crosses the horizontal), and the right one strikes downwards. Moving further, the left hand enters the second half of the supporting part of the stroke, the right one finishes the sweep, the left leg bends at the knee joint (the foot approaches the surface of the water), and the right one moves up (the foot approaches the horizontal). At the next moment, the left hand carries out the second half of the support part of the stroke, leaves the water and approaches the middle of the carry, the right one enters the water, makes a grab and approaches the middle of the first half of the support part of the stroke, the left leg kicks down, and the right leg rises up (crosses horizontal). Completing the cycle of movements, the left hand finishes the sweep, the right one enters the second half of the supporting part of the stroke, the left leg moves up (the foot is near the horizontal), and the right one bends at the knee joint (the foot approaches the surface of the water).
Then the cycle of movements is repeated. Thus, the downward kick of one leg coincides with the most efficient part of the stroke of the same arm (the second half of the main part of the stroke). In a two-beat crawl, the hand produces a strong and fast stroke. Therefore, swimmers who have perfectly mastered the technique of this version of the freestyle develop a higher tempo of movement than athletes who use the six-beat freestyle at the same distance.
Inhalation in a two-beat freestyle is performed between the end of the phase of the hand coming out of the water and the beginning of the phase of carrying this hand. The other hand at this moment is respectively at the end of the catch phase and at the beginning of the supporting part of the stroke.

Rice. 9
Four-beat crawl (see Fig. 9). A distinctive feature of the four-strike freestyle is the sequential execution of the main kicks: right down, left down-in (surrounding), left down and right down-in (surrounding).
I. p. — The left hand enters the water (the hand is in the water), the right begins the second half of the supporting part of the stroke (the hand is under the chest), the left leg takes a horizontal position, the right is bent at the knee joint, located at the top (the foot is at the surface of the water).
From the starting position, the left (right) hand enters the water, makes a grab and begins the first half of the supporting part of the stroke, the right one carries out the second half of the supporting part of the stroke and begins to exit the water, the left leg rises to the surface of the water, bending at the knee joint, and the right one produces blow down. Next, the left hand approaches the middle of the first half of the main part of the stroke, and the right one comes out of the water and approaches the middle of the stroke, the left leg performs a circular downward-inward kick, and the right one slowly rises up (its foot is lower than the foot of the left leg — legs are crossed). Continuing the movement, the left hand, having completed the first, enters the second half of the supporting part of the stroke, the right one finishes the movement above the water and begins to enter the water. The left leg, bending at the knee joint, moves in the opposite direction up and out (the foot is at the surface of the water), and the right leg freely rises to a horizontal position. At the next moment, the left hand performs the second half of the supporting part of the stroke and begins to leave the water, the right one enters the water, makes a grab and begins the first half of the supporting part of the stroke, the left leg strikes down, and the right bends at the knee joint and continues to move upward (foot reaches the surface of the water). Finishing the stroke, the left hand comes out of the water and approaches the middle of the stroke, and the right hand passes the middle of the first half of the main part of the stroke, the left leg slowly rises up, and the right one performs a downward-inward kick (the foot remains above the foot of the left leg — legs are crossed).
The cycle of movements ends when the left hand finishes the sweep, the right one enters the second half of the supporting part of the stroke, the left leg freely rises to a horizontal position, and the right one bends at the knee joint and moves up and out (foot at the surface of the water).
In the four-beat crawl, the breathing technique is not much different from the two-beat crawl. However, at the moment of inhalation, the swimmer performs a cross kick: if the inhalation is performed under the right hand — cross kick is done by the left leg, if under the left — right leg.

Rice. 10
Six-beat crawl (see Fig. 10). The coordination of movements in the six-stroke freestyle is a cross-coordination that gives the body the most stable position in the water.
I. p. — the right hand is in the middle of the stroke, the left begins the supporting part of the stroke, the right leg is at the bottom (foot 30-40 cm from the surface of the water), the left is bent at the knee joint, located at the top (foot at the surface of the water).
When the right hand finishes the sweep and enters the water, the left one finishes the first half of the support part of the stroke, the right leg moves up, and the left kicks downwards.
Moving further, the right hand makes a grab, the left one finishes the supporting part of the stroke and begins to leave the water, the right leg strikes from top to bottom, the left one moves up. Then the right hand finishes the catch and begins the support part of the stroke, the left comes out of the water and performs the first half of the carry, the right leg rises up, and the left kicks downwards. Next, the right hand finishes the first half of the supporting part of the stroke, the left one finishes the carry and enters the water, the right leg strikes from top to bottom, and the left one moves up. At the next moment, the right hand finishes the supporting part of the stroke and begins to leave the water, the left one makes a grab, the right leg rises up, and the left one strikes from top to bottom. The cycle ends when the right hand comes out of the water, completes the first half of the sweep, the left finishes the catch and begins the support portion of the stroke, the right leg kicks down, and the left moves up.
If a swimmer inhales under his right arm, then at this moment the right arm comes out of the water and begins the sweep, the left begins the supporting part of the stroke, the right leg kicks from top to bottom, and the left moves upward. If the inhalation is made under the left hand, then the positions of the right and left arms and legs change accordingly.
3.3. Back crawl swimming technique
Body position and general characteristics of the method. The swimmer’s body is located at the surface of the water and is in a well-streamlined, close to horizontal position (angle of “attack” 4-10°), the shoulders are slightly raised. The head lies on the water (its position when swimming is relatively stable), the face is turned upward, and the chin is slightly lowered onto the chest. The neck is relaxed. The swimmer looks up and slightly back (the gaze is fixed at approximately an angle of 40-45° relative to the surface of the water). The water level is slightly above the ears.
The crawl on the back is characterized by alternating continuous movements of the arms and legs (see Fig. 11). During swimming, the shoulder girdle rhythmically rotates left and right relative to the longitudinal axis with each stroke. Such rolls help to strengthen the hand stroke, perform it at an unnecessary depth, and also carry the hand above the water with minimal resistance. The degree of roll when swimming crawl on the back is slightly less than on the chest, and is approximately 25-40°.
Its main difference from other swimming methods is the position of the body and relatively free breathing (exhalation is performed above the water).
Each cycle of movements in this method consists of two alternating movements of the arms, six alternating movements of the legs, one inhalation and one exhalation. This most common variation of the technique is called the six-beat back crawl.
Breath.In back crawl, breathing does not depend on environmental conditions: inhalation and exhalation are performed over water. However, even in this method, breathing should be continuous and rhythmic. Breathing is most often coordinated with a full cycle of movements of one hand. Inhale through a wide open mouth while raising your hand above the water, exhale during the stroke and exit of this hand from the water.
In this case, the completed respiratory cycle occurs in two strokes with the arms. Skilled swimmers can perform one inhalation and exhalation for 3 arm strokes, mainly during acceleration.
Leg movements. Just like in front crawl,legsWhen swimming backstroke, continuous alternating counter-movements are performed from top to bottom and bottom to top with an amplitude equal to approximately a third of the swimmer’s height. These movements provide the body with a stable horizontal position and maintain forward speed. The upward movement of the leg is called rowing (working), and the downward movement is called preparatory. The range of motion of the hips is moderate. They stay close to the surface of the water. The legs bend at the knee joints up to 130-140°, the feet move in the water with a fairly moderate amplitude. Too small movements of the feet at the surface of the water are considered ineffective.
Preparatory phase (movement top down). In the initial (extreme upper) position, the leg straightened at the knee joint with the relaxed foot turned inward is at the surface of the water and occupies a slightly inclined position relative to the body. The downward movement begins with straight leg extension at the hip joint. Having passed the horizontal position, the straight leg continues to move downwards, bending at the hip joint (backwards) to approximately an angle of 170°. Next, the leg begins to bend at the knee joint, while the lower leg and foot continue to move downward, and the thigh, extending at the hip joint, begins to move upward. When the angle between the front surface of the thigh and the torso (at the hip joint) is approximately 130-140°, the movement of the leg from top to bottom is considered complete.
Reference phase(movement down up). The upward movement begins with sequential extension of the leg at the knee and ankle joints (in the latter, extension is carried out at the very end of the stroke), the thigh continues to flex at the hip joint. At this moment, the thigh, lower leg and foot move upward. When the knee joint reaches the surface of the water, the thigh begins to move downward (extending at the hip joint), ahead of the lower leg and foot, which continue to move upward. The advanced downward movement of the hip promotes rapid extension of the leg at the knee joint and thereby increases the speed of the whip-like movement of the foot up and back. As a result of this movement of the leg, the foot creates a certain traction force, which helps propel it forward. When the leg straightens at the knee joint, the working movement is considered complete.
Coordination of footwork movements . From the lowest position, one leg moves up, and the other simultaneously moves down from the highest position. When swimming back crawl, the leg can go down to a greater depth than in the front crawl method. As the swimmer's speed increases, the amplitude of leg movements decreases.

Rice. eleven
Hand movements.Just as in the front crawl method, the forward movement of the body when swimming the back crawl is mainly carried out through arm movements. An approximate trajectory of hand movement is shown in Fig. 12. The movements of the arms are also coordinately subordinate to the movements of the legs and breathing.
The cycle of movements of each hand consists of the following phases:
- hand entry into the water;
- capture;
— supporting part (two subphases - pulling and pushing);
- hand coming out of the water;
- raising your hands above the water.
The duration of the movement cycle is 1.10-1.4 s.
The phase of hand entry into the water. After being carried through the air, the straight arm is lowered into the water on a line passing through the shoulder joint of the same name and located either parallel to the longitudinal axis of the body, or at a certain angle to this axis (no more than 15° to the side from it). When immersed in water, the palm faces outward and the hand is rotated so that the little finger enters the water first. The duration of the phase is 0.08-0.10 s (6-8% of the time of the full cycle of movements).
Capture phase.After the hand enters the water, the body begins to rotate around the longitudinal axis towards the hand that entered the water. This helps the straight arm quickly descend down and forward to a depth of 15-20 cm. As it descends, the arm begins to bend at the elbow joint, and the hand moves forward, down, and outward to a position perpendicular to the direction of movement and begins to capture water. Continuing the movement down-forward-to the side, the arm bends at the elbow joint to an angle of 150°, while the elbow goes down and the hand is immersed in the water up to 30 cm (for some swimmers up to 40 cm) and is located perpendicular to the direction of body movement, remaining higher elbow. The shoulder girdle rotates with the hand, facilitating a deeper grip.
The duration of the capture phase is 0.15-0.20 s (10-15% of the time of the entire cycle).
Pull-up subphase begins at the moment when the hand begins to move back and up due to flexion of the arm at the elbow joint and rotation of the forearm. Moving backward along the body, the arm turns the rowing surfaces in this direction and continues to bend at the elbow joint, forming an angle between the shoulder and forearm in the middle of the stroke equal to 70-100°. The hand rises to the surface of the water (without disturbing it), and the elbow remains turned down.
IN repulsion subphase, which begins when the hand passes the line of the shoulder joints, the arm gradually extends at the elbow joint and ends with an overflowing movement of the hand back-down-inside. At this moment, the arm is fully straightened, and the hand is lowered to a depth of 30-40 cm from the surface of the water. When performing a push-off, it is important that the swimmer strives not just to push the water back with his hand, but to lean on it, sending the shoulder girdle forward and slightly upward. This is expressed in the suspension of the back-down movement of the elbow of the rowing arm and optimal fixation of the shoulder. At the end of the subphase, the hand is slightly below the buttocks, at approximately the same depth as at the end of the grip phase.
Throughout the entire support phase of the stroke, the hand moves along a curved path and, maintaining a position perpendicular to the direction of its movement, is located near the surface of the water. The perpendicular position of the hand ensures throughout the entire supporting part the maximum effect of the traction force that occurs on the rowing surfaces of the hand and forearm. The rotation of the body around the longitudinal axis also enhances the stroke movement.
The duration of the support phase of the stroke is 0.40-0.50 s (30-40% of the time of the entire cycle).

Rice. 12
The phase when the hand comes out of the water. By the time the hand moves in the water, the tension in the muscles involved in the stroke stops. The next moment, the swimmer, rotating the forearm, turns the palm to the thigh and successively lifts the hand, forearm and shoulder out of the water. Then the movement (carrying) of the hand above the water begins. The exit of the arm from the water is facilitated by the roll of the body to the opposite side and the active raising of part of the shoulder girdle of the arm that has completed the stroke above the surface of the water.
The duration of this phase is 0.10-0.15 s (8-15% of the time of the full cycle of movements).
The phase of bringing the hand above the water . The movement of the straight arm above the water is carried out in a vertical plane passing through the shoulder joint. The hand moves through the air straight, relaxed, with minimal muscle effort. During the carry, the palm turns outward. The hand is carried above the water evenly, in accordance with the stroke speed of the other hand.
The duration of the phase is 0.40-0.45 s (30-35% of the time of the entire cycle).
Coordination of hand movements. When the right hand is in front (the catching phase), the left hand at this moment is removed from the water and begins to carry. Next, the right hand performs the supporting part of the stroke, and the left one sweeps over the water and enters the water. After this, the right hand rises out of the water and begins to carry, and the left finishes the grab. The right hand then sweeps over the water and enters the water, while the left performs the supporting part of the stroke. Next, the cycle of hand movement is repeated again.
The uniformity of the forward movement when swimming on the back is ensured by a minimal break in the execution of arm movements in the supporting part of the stroke: at the moment the supporting part of the stroke ends with one hand, the other should begin this part of the stroke as early as possible. To meet this requirement, it is necessary to shorten the capture phase.
General coordination of movements. When swimming on your back, the most rational, providing the body with uniform forward movement and creating the most stable position in the water, is the six-stroke crawl. The coordination of the movements of the arms and legs is carried out as follows.
I. p. - the left hand is in the water in front of the shoulder joint, the right has completed the supporting part of the stroke (the hand near the hip), the left leg is below, the right is at the surface of the water.
From the starting position, the left hand makes a grab, the right one comes out of the water and begins to carry, the left leg kicks from the bottom up, and the right one goes down. Continuing the movement, the left hand performs the first half of the support part of the stroke, the right goes through the middle of the carry, the left leg moves down, and the right kicks from the bottom up. Then the left hand carries out the second half of the main part of the stroke, the right one finishes the sweep and enters the water, the left leg makes an upward kick, and the right one moves downwards. Next, the left hand comes out of the water and begins to carry it, the right one makes a grab, the left leg moves down, and the right leg moves from bottom to top. At the next moment, the left hand is in the middle of the stroke, the right one performs the first half of the supporting part of the stroke, the left leg performs an upward kick, and the right one goes down. The cycle ends when the left arm finishes the sweep and enters the water, the right arm finishes the support portion of the stroke, the left leg drops down, and the right kicks upward.
3.4. Breaststroke swimming technique
Body position and general characteristics of the method. When swimming breaststroke, the swimmer's body is located at the surface of the water in a straightened position, and the head is lowered with the face into the water. However, during periods of performing strokes with arms and legs, as well as at the time of inhalation, the body position and angles of attack are constantly changing.
Depending on the position of the body, there are two options for breaststroke swimming techniques. In the first option, the angle of attack of the body and the magnitude of its change within the cycle are insignificant (2-10°). In the second, the angle of attack and its changes within the cycle are much greater (8-20°). Both techniques are effective and are used to achieve high athletic results. In the first case, the position of the body creates the best streamlining, ensures slight oscillation of the body in the cycle of movements, and helps to increase the advancement of the body when performing supporting (working) movements of the legs. In the second case, the body position ensures a more uniform action of the traction force within the cycle, increases the efficiency of moving the arms forward, and reduces body sway during the period of inhalation.
Breaststroke is characterized by simultaneous and symmetrical movements of the arms and legs (see Fig. 13). Unlike butterfly, the entire cycle of arm movements is carried out in the water.
Each cycle of movements in this method consists of one movement of the arms, one movement of the legs, one inhalation and one exhalation into the water.
Hands and feet are equally movers. Hands set the pace and rhythm, overall coordination of movements and are closely related to breathing.
Breath.To inhale, the swimmer must raise his head so that his mouth is above the water. This position of the head depends on the position of the shoulder girdle. The highest position of the shoulder girdle is observed at the end of the arm stroke. It is at this moment that the breath is taken. Then the head is lowered face into the water and after a short pause, exhalation begins through the mouth and nose and continues for the rest of the cycle.
In breaststroke there is a so-called “late breath”. It begins at the end of the arm stroke, when the hands and elbows of the bent arms are directed inward and forward. The “late breath” technique is most suitable for high-speed breaststroke variations, as it helps keep the body in a well-streamlined position during the arm stroke with high elbows, and also allows you to perform the second half of the stroke with the most power.

Rice. 13
Body position and general characteristics of the method. When swimming in the butterfly stroke, the swimmer's body is located on the surface of the water in an extended position. The head is placed face down in the water. Due to the wave-like movements of the torso (raising the pelvis during the downward strike of the feet) and some oscillation in the vertical plane of the shoulder girdle, the angle of attack changes during one cycle within ±15-20°.
Butterfly is characterized by simultaneous symmetrical movements of the arms and legs, as well as wave-like movements of the torso, which help the movements of the arms and enhance the work of the legs (Fig. 15). Individual elements of the technique of this method of swimming (movement of the arms and legs) are not much different from the front crawl technique.
As a rule, when swimming butterfly, swimmers use its high-speed variety - dolphin (when the legs move up and down like a dolphin's tail). Hence, in many literary sources the description of this method is called dolphin.
When swimming butterfly, there are several options for coordinating movements (one-beat, two-beat and three-beat coordination). The most common is the two-impact version. Each cycle of movements in this variation consists of one arm movement, two kicks, one inhalation and one exhalation. In this cycle, the movements of the arms and legs are performed in a certain sequence. Unlike other methods, when swimming butterfly, the torso takes an active part in the movements of the legs.
Breath.The shoulder girdle occupies the highest position at the end of the main phase of the arm stroke. At this moment, the head rises out of the water and the inhalation begins, which ends at the beginning of carrying the hands above the water. Then the head is lowered face into the water, and the hands finish carrying it. After a short pause, exhalation begins, which is done through the mouth and nose and continues throughout the rest of the cycle.
When swimming butterfly, one inhalation and exhalation is usually used for a full cycle of arm movements. Well-trained swimmers inhale and exhale once for two full cycles of arm movements.

Rice. 15
Movements of the legs and torso. In the butterfly style, the legs perform continuous, simultaneous and symmetrical movements from top to bottom and bottom to top. The swimmer’s torso is actively involved in these movements, which also contributes to the best movement of the arms above the water and inhalation. The general rhythm of movement of the torso and legs is determined by the rhythm of movement of the upper body. The cycle of leg movements consists of 2 phases - support (movement from top to bottom, called kick) and preparatory (movement of legs from bottom to top).
Preparatory phase (movement down up). In the lowest position, both legs are straightened at the knee joints, and the feet are slightly turned inward. In relation to the body, the legs occupy an inclined position (bent at the hip joints to approximately an angle of 145-160°), the pelvis is on the surface of the water, the upper part of the body is lowered into the water. The upward movement begins with straight leg extension at the hip joints with simultaneous flexion of the torso at the waist (backward) and lowering of the pelvis. Until approximately a horizontal position, the legs move straight up, and then, following the pelvis, the hips begin to move down, the legs bend at the knee joints, and the feet continue to move up. Next, the hips quickly drop down, the knees continue to bend, and the feet rise to the surface of the water. When the knees are bent to an angle of 90°, the pelvis is in the extreme position below, and the feet are bent at the ankle joint - the legs are ready for a downward strike (the angle between the thigh and the torso is 150-165°).
Reference phase(downward kick) begins when the hips continue to move downwards, dragging the lower legs and feet with them. The latter perform a downward movement with acceleration and, under the influence of the counter resistance of the water, bend at the ankle joints. As the legs move downwards, they begin to extend at the knee joints. As the shins and feet approach a horizontal position, the pelvis and hips begin to rise toward the surface of the water. At this moment, the legs continue to extend at the knee joints, and the legs and feet move energetically downward. Next, the pelvis and hips come to the surface of the water, the legs quickly straighten at the knee joints and accelerate with a whip-like movement downwards. The support phase is considered complete at the moment when the buttocks appear on the surface of the water and the legs are fully straightened at the knee joints. During the downward kick, the feet rotate inward. Towards the end of the downward kick, the swimmer extends the torso in the lumbar region.
Hand movements.In butterfly, the forward movement of the body is mainly ensured by the arms, which move in the water along curved trajectories (see Fig. 16). When swimming butterfly, the cycle of arm movement consists of the following phases:
— hand entry into the water;
- capture;
- support phase (2 subphases - pulling and pushing);
- taking your hands out of the water;
- raising your hands above the water.
The duration of a full cycle of hand movements is 1.07-1.20 s.
Phase of entering the hands into the water. When the movement above the water is completed, straight but tense arms are lowered into the water approximately shoulder width apart in the following sequence: hands, forearms and shoulders. When entering the water, the hands are facing outward and down, and the elbows are at the top. The head is lowered into the water, the face is turned down and slightly forward. After entering the water, both straight arms should actively move forward and downward.
The duration of this phase is 0.06-0.09 s (6-10% of the full cycle of hand movements).
Capture phase.This part of the stroke is characterized by slight bending of the arms at the wrist and elbow joints. The beginning of the grip is carried out by moving the arms forward, down and to the sides. The rowing surfaces of the hands perform movements at a small angle of attack. In the second half of the grip, the hands move down, back and to the sides, also with a small angle of attack. During the grab, the elbows remain high, the arms move quickly, and the upper body moves down with a small amplitude. The grip ends at the moment when the angle between the surface of the water and the forearm is approximately 30°, and the hands are at the maximum distance from each other. In the capture phase, the head is lowered into the water, the face is turned forward and down.
The duration of the phase is 0.18-0.24 s (15-20% of the time of the full cycle of hand movement).
Support phase (2 subphases - pulling and pushing).
Pull-up subphase begins from the moment when the hands and forearms, changing the direction of movement, move inward, downward, and backward. Moving in this direction, the arms continue to bend at the elbow joints, providing rotation to the forearms and forward movement to the hands from front to back along a curved path. By the middle of the first half of the main part of the stroke, the rowing planes of the hand and forearm occupy the best position for support on the water and subsequent repulsion (the angle of the forearm with the surface of the water is 50°, and the plane of the hand is 60°). Elbows point up and out and are held in a high position. By the end of the pulling subphase, the hand and forearm make an angle of 75-85° with the surface of the water. At this moment, the hands are located under the shoulder joints at a short distance from each other, and the angle of flexion of the arms at the elbow joints reaches 90°.
In the second half of the support phase, in repulsion subphase, the swimmer strives to push off from a large mass of water and propel his body forward. The elbows continue to be held high, and the rowing planes of the hands and forearms remain facing backward and moving quickly in that direction. After the hands and forearms have crossed the vertical plane passing through the shoulder joints, the arms, continuing a powerful movement back, gradually straighten at the elbow joints and finish the main part of the stroke at the hips almost straight.
To make it easier to lift their arms out of the water, many swimmers, in the final part of the support phase of the stroke, move their hands back and up and slightly outward.
The duration of this phase is 0.42-0.50 s (40-45% of the full cycle time).
The phase when hands come out of the water. The arms rise from the water in the following sequence: shoulders, forearms and hands. At the moment of leaving the water, the arms are slightly bent at the elbow joints, and the hands are turned with the palms back and up (in another option, inward).
The duration of the phase is 0.04-0.08 s (5-7% of the total cycle time).
The phase of bringing your hands above the water. After leaving the water, the arms bent at the elbow joints (flexion angle is 140-165°) simultaneously perform a swing movement over the water from the sides forward without unnecessary muscle tension and at high speed, while the elbow is higher than the hand. At the beginning of the stroke, the backs of the hands are turned towards the water. At the moment when the hands reach the shoulder line, the palms are facing outward. Before entering the water, keep the elbow above the hand and palms facing down.
The duration of the phase is 0.30-0.38 s (30-35% of the full cycle time).

Rice. 16
General coordination of movements.
The most rational coordination of movements when swimming butterfly is observed with two-stroke coordination. It ensures to the greatest extent the continuity of working movements of the arms and legs, the streamlined position of the body and, as a result, the uniformity of the swimmer’s forward movement throughout each cycle.
Coordination of movements is carried out as follows.
I. p. - arms are extended forward (end of the phase of entering the hands into the water), head is lowered into the water - face is turned down, feet are down (end of the downward stroke).
From the starting position, the arms perform a grab, and the legs freely rise to a horizontal position. Next, the arms bend at the elbow joints and carry out the first half of the supporting part of the stroke, and the legs, bending as much as possible at the knee joints, send the feet to the surface of the water. At the next moment, the arms perform the second half of the supporting part of the stroke, and the legs make a whip-like downward blow. At this moment, the torso moves forward and upward, and the pelvis and hips rise to the surface of the water, providing good streamlining. After this, the arms are taken out of the water and carry out the first half of the stroke (the swimmer takes a breath), the legs are straightened and then bent at the knee joints again, the feet approach the surface of the water. The cycle ends when the arms enter the water and the legs perform a second whip-like downward stroke.
3.6. Technique for performing starts
Performing a start when swimming using sports methods is important in overcoming the distance. The outcome of the fight in competitions largely depends on how well the starting technique is mastered, since sometimes success is determined by the difference in hundredths of a second. Sometimes the advantage gained at the start cannot be regained over the course of the race, especially at sprint distances. Losing at the start puts the swimmer in a disadvantageous psychological position as a catcher.
A fairly effective start consists of many components - attentiveness, speed of reaction, technique of executing the start itself. Special requirements for these components are also imposed in relay races, when each team has to not only perform the initial start, but also when passing the baton.
In accordance with the rules of the competition, all starts are divided into 2 categories: starts from the bed (for freestyle or front crawl, breaststroke and butterfly) and from the water (backstroke).
The start itself is preceded by certain actions of the swimmer, called by the team of the starter judge and regulated by the rules of the competition, the result of which should be the starting position for the start itself.
Technique for starting from a bedside table
At the preliminary command of the judge “Participants to take their places” (or a sound signal), the athletes approach the table and stand on its rear edge in anticipation of the next command.
After the preparatory command “To start,” they stand on the front edge of the bedside table and must take a stationary starting position to start. A fixed starting position makes it possible to place all competition participants in relatively equal conditions, as well as to record a false start (an athlete starting before the judge’s command).
A shot (sound signal, command “March”) serves as a signal to begin the starting actions. A certain period of time passes between the shot and the actions themselves, called the starting reaction time. For the most part, human reaction speed is innate and can hardly be trained. However, the starting reaction is the object of targeted improvement.
Initial position The swimmer’s start pressure should be such that he can perform a more effective starting jump in the least amount of time.
There are several common options for starting positions when starting from a bedside table (see Fig. 17). The choice of the starting position for the start is determined by the individual psychophysiological characteristics of the athlete, as well as the type of competitive program.

a)b)
Rice. 17
In all cases, the feet are placed hip-width or shoulder-width apart and the toes are on (or gripping) the front edge of the bedside table. The degree of flexion in the knee joints can be different. The angle between the thigh and lower leg ranges from 100-150°. It is believed that bending the legs to an angle of 90° or less does not increase the force of the push and leads to loss of time.
In the initial position, the torso is tilted forward, the swimmer’s center of gravity is above the front edge of the bedside table with the feet in a stable position. The angle between the front surface of the thighs and the torso ranges from 10 to 60°.
With the traditional start version (Fig. 17b), the arms of the swimmer, who has taken the starting position on the bedside table, are extended to swing forward and down or pulled back. The face is facing down or towards the distance.
When starting with a grab (Fig. 17a), the swimmer’s hands grab the edge of the table from the front or sides. In this case, the feet are on the same line, grasping the front edge of the bedside table with your fingers, or one foot (the jogging leg) grabs the front edge of the bedside table with your fingers, and the other is located behind. In this position, the swimmer's knees are over the toes (except when one leg is in front of the other), the shoulder girdle and head are slightly forward. The head is lowered, breathing is held. The weight is transferred to the front of the feet (or one foot), the swimmer is ready to instantly begin the starting actions.
The technique of starting from a bedside table consists of the following phases:
- squat;
— flight;
— entry into the water;
— sliding;
- exit to the surface.

Rice. 18
Squat phasebegins from the initial (stationary) position and lasts until the legs begin to extend at the knee joints. The athlete quickly throws the body out of balance and performs an energetic squat with the body and head moving forward and upward.
Depending on the initial position, the squat may be with a swing of the arms (in the initial position with a grip, there is no swing of the arms). This is either an energetic movement of the arms back and forth, and then down and forward, or a circular movement of the arms up, back, down and forward. The arms must perform this movement as quickly as possible, in strict coordination with the energetic movement of the body and the squat.
Push-off phase with arm swing (see Fig. 18a ) lasts until you lift your legs off the bedside table. At the moment of repulsion, the torso and legs are straightened, the longitudinal axis of the body is directed forward and upward at an angle of 15-25° to the horizon, straight arms are extended forward, the angle between them and the longitudinal axis of the body is 40-80°, the face is directed forward and slightly downward. The main task of the phase is to provide the body with the maximum possible amount of movement in a minimum period of time and send it flying at high speed along the optimal trajectory. As a rule, at the end of the phase, inhalation begins.
In many literary sources, the squat and push-off phases are combined. In total, approximately 0.35-0.50 seconds are spent on the starting movements on the stand, and the time from the signal to the lifting of the legs from the stand, i.e., taking into account the swimmer’s starting reaction to the signal (shot), is 0.65-0 .95s.
Flight phase(see Fig. 18b) lasts 0.35-0.40 s (until the hands touch the water) and is performed along the optimal trajectory, which, of course, is set with the help of a push in the previous phase. The athlete's flight speed at the moment of lifting his legs off the bedside table is approximately 4.0-4.5 m/s. Highly skilled athletes manage to fly through the air about 3.3 m (maximum up to 4.0-4.2 m). At the beginning of the flight, the swimmer’s arms, having completed the swing, are extended forward, the head takes a position between the arms. Next, the swimmer’s body turns in such a way that the entry into the water is made at one point. During the flight, inhalation ends.
Entry phase (see Fig. 18c) . At the moment of completion of the flight, the arms and torso enter the water at an angle of 20-40°. The swimmer's body is immersed in the water in a well-streamlined position, the head is between the hands, the legs are slightly bent at the hip joints, and the pelvis is raised. The entry speed into the water is approximately 5.0-5.5 m/s. This phase takes approximately 0.25-0.30 s.
In butterfly and breaststroke swims, athletes sometimes use a start with a steeper entry into the water (30-40°), which provides them with a deeper glide under water.
Sliding phase(see Fig. 18d) . This phase lasts until the start of the first arm stroke with the task of maintaining speed over a larger segment of the path. This part of the start, taking into account the time of entry into the water, takes 1.5-1.9 s, and the total length of the slide is 2-3.5 m. By changing the position of the arms, head and torso deflection, the athlete adjusts the depth of the dive.
Depending on the method of swimming, the athlete, at the moment of losing the initial speed of entering the water, begins to move under water. When swimming crawl and butterfly, the swimmer begins the movements with his legs. When swimming breaststroke, the athlete performs a stroke with his arms up to the hips, to the sides, down, in, and back, increasing the gliding speed and also called the “second glide.”
Phase reaching the surface(see Fig. 18d ). Reaching the surface is carried out through strokes with the arms and legs and lasts until the moment when the swimmer finds himself in a position characteristic of the beginning of the first generalized phase of the swimming technique in this way. In this phase, it is necessary to “pick up” the high gliding speed with rowing movements. For example, when swimming crawl, an athlete performs a stroke with his hand, coordinating it with active movements of his legs. At this point, the distance covered by the athlete is: 6.0-7.5 m in freestyle, 7.0-8.5 m in dolphin and breaststroke.
The exit after the start when swimming breaststroke is different from the exit in other swimming methods. After the “second slide,” the arms are brought forward while the legs are simultaneously pulled up to perform a strike.
In relay swimming, the start is taken at the moment the swimmer touches the wall of the pool, finishing the previous stage. The starter’s task is to quickly react to the touch and at the same time not get ahead of it (the touch) by pushing off and jumping prematurely, so as not to be disqualified.
Water start technique
The start from the water is performed when swimming on the back.
At a preliminary command (signal), athletes jump into the water and grab the handrails of the bedside table with their hands, standing facing it. In this position, the arms are almost straight, the legs are bent and rest securely against the wall of the pool just below the water level, while the knees remain between the hands.
At the command “Start!” the swimmer bends his arms, pulling his body slightly towards the handrails, and takes his starting position.
After the shot (sound signal or the “March” command), the athlete begins the start.
Initial position: The swimmer, with his elbows bent, holds the handrails shoulder-width apart with an overhand (or side) grip and carefully waits for the signal. The shoulder girdle is raised as high as possible, the head is lowered between the hands. The body is bent at the hip and knee joints, the feet are hip-width apart and firmly rest against the wall of the pool below the water level (see Fig. 19a).
The technique of launching from water is usually divided into the following phases:
- push-off with arm swing;
— flight;
— entry into the water;
— sliding;
- exit to the surface.
Push-off phase with arm swing (see Fig. 19b) lasts until the feet lift off the wall. Pushing off with the legs occurs with a simultaneous thrust of the pelvis upward, a sharp throwing back of the head and an energetic swing of the arms forward. At the moment of completion of the repulsion, the body is located completely above the water, the legs and torso are straightened, the head is thrown back, the hands are in front and slightly above the shoulders. At this time, a quick exhalation and inhalation is performed.
From the moment the start signal is given until the end of the repulsion phase, about 0.70-0.95 s passes.
Flight phase(see Fig. 19c) lasts 0.06-0.15 s and continues until your hands touch the surface of the water with the goal of flying as far as possible. In this case, the swimmer’s body flies through the air in a bent position, arms extended forward, hands together. In flight, a man covers a distance of approximately 2.4-2.7 m, a woman - 2.2-2.5 m.
Entry phase (see Fig. 19d). The swimmer's body is immersed in the water in a streamlined position and optimally tense. The hands touch the water first, then the back of the head, shoulder girdle, and back.
Sliding phase(see Fig. 19e) is short-lived and lasts until the start of the first hand stroke. At this moment, the speed is 4.5-4.7 m/s. After being completely immersed in the water, the swimmer immediately begins to move his legs. At first it is 2-3 (possibly more) simultaneous dolphin-like movements of the legs, then the transition to alternating movements of the legs. Based on the depth and speed of swimming, the swimmer prepares to begin the first stroke with his arms.

Rice. 19
Surface phase (see Fig. 19e) is carried out through a strong hand stroke and alternating crawl movements of the legs. At this time, the other arm remains extended forward to the limit, the face at the end of the stroke appears on the surface of the water. The task is to catch the high gliding speed in a timely manner and bring the body to the surface in such a way as to move on to swimming at a distance without loss of speed and optimal rhythm. On the 2-3rd stroke with the arms, the swimmer should give the body a streamlined and high position with the pelvis at the surface of the water and the optimal position of the head (fix the gaze at approximately an angle of 45° to the surface of the water).
3.7. Turning technique
When covering the distance in competition, a swimmer must be able to effectively make turns at the wall of the pool. A correctly executed turn allows the swimmer to reduce the time it takes to cover the distance, save strength and maintain the necessary rhythm and tempo of movements and breathing. A swimmer also encounters navigating turns during regular training sessions.
The turning section of the distance is taken to be 7.5 m before and 7.5 m after the turning wall. The turn itself begins with the head diving under the water immediately in front of the pool wall or touching it with the hands and continues until the first cycle of normal swimming movements on the surface of the water begins after the turn.
Performing a turn is conventionally divided into phases:
— swimming (approach) with touching (or without touching);
— rotation;
- repulsion;
— sliding;
- exit to the surface.
Rotations can be performed predominantly in a horizontal plane around a vertical axis and predominantly in a vertical plane around a horizontal axis. When performing a turn in the horizontal plane, the swimmer, after the rotation, maintains the body position that was before the turn. Turns in the horizontal plane are much easier, but they take more time to complete. Turns performed in the vertical plane have a number of advantages. The main one is the ability to group and reduce the moment of inertia to a minimum. In addition, during these turns, the energy of the forward motion of the body is used, and the resistance of the water can be somewhat reduced by the movement of some parts of the body above the water during the rotation.
All turns are divided into two large groups: open and closed. Open turns are easy to perform and are most suitable for teaching beginner swimmers. The features of an open turn also include the ability of the athlete to take a breath. If you inhale before turning, and the rotation is performed with holding your breath and exhaling, then the turn is called closed.
Technique for performing turns when swimming breaststroke and butterfly. A feature of turns when swimming butterfly and breaststroke is the symmetrical touching of the side with both hands and a turn (rotation) in any direction convenient for the swimmer. For high-speed breaststroke and butterfly swimming, an open “pendulum” type turn is used (Fig. 20).
Swim and touch phase . When swimming up to the side, the athlete touches it with both hands at the same time at the same level and close to the surface of the water. At the moment the hands touch the wall, the swimmer’s body is horizontal, legs and arms are extended, and the head is between the arms. Then the athlete bends his arms at the elbow joints, bringing his head and shoulder girdle closer to the wall, bends his legs and, pushing off the wall of the pool with his hands, begins to rotate.
Rotation phase.Rotation is performed in a lateral plane close to the vertical. The hand of the same name on the side of the turn comes off the wall and is brought forward under the water, the other hand moves above the water and enters it in front of the head. At this moment, the shoulder girdle is above the water, the swimmer takes a breath. The rotation lasts 0.80-0.95 s and ends with placing the feet on the wall of the pool.
Repulsion phase. The rotation turns into repulsion, which lasts on average 0.32 s until the legs lift off the wall. After the rotation, the swimmer plunges into the water for a slight dip before pushing off with his legs, ending up partially in a position on his side. Repulsion occurs while holding your breath, maintaining a horizontal and streamlined body position relative to the water. During the push-off, a rollover occurs on the chest
Sliding phase. Sliding is in many ways similar to similar phases of movements when starting from a bedside table. However, the sliding speed of the body after the turn is noticeably lower than after the start (at the initial moment of the phase it is 2.20-1.90 m/s).

Fig.20
Surface phase. The swimmer has to start the first hand stroke much earlier than in a similar phase after the start due to short-term sliding.
The distance covered by the athlete after pushing off to the moment of reaching the surface of the water is 4.2-5.4 m when swimming with a dolphin, and 4.8-6.4 m when swimming with breaststroke.
In the practice of sports breaststroke and butterfly swimming, simpler flat turns are used, mainly in the horizontal plane (Fig. 21), which are recommended in the initial stages of training. Their main drawback is that it takes too long to turn relative to a horizontal plane with great resistance. This turn can be either open or closed (with holding your breath), as it is faster.

Rice. 21
Technique for performing turns when swimming front crawl. When swimming crawl, all the turns described when swimming breaststroke and butterfly are used, i.e. simple flat turns, both open, with inhalation, and closed, when the head is in the water and the turn is performed with breath holding (Fig. 22) and “pendulum” (Fig. 23). The only differences are touching with one hand and turning (rotating) strictly in the opposite direction from the touching hand.

Fig.22

Rice. 23
When swimming crawl, where the rules allow you to touch the wall with any part of the body, a forward somersault turn is used (see Fig. 24). Swimmers do not touch the wall with their hand, which reduces the turn time and makes it more dynamic, but only place both feet on it to take off. This is a basic turn for skilled athletes. Let us consider the phase composition of this rotation.
Swimming phase. The athlete accelerates onto the wall of the pool, finishes the stroke with one hand, and then with the other (about 1.5 m before the wall), leaving them at the hips.
Rotation phase.The swimmer begins diving forward and down and slightly to the side. The upper part of the body goes under the water, the outstretched legs move along the surface of the water towards the wall, the hands are directed in the direction opposite to the wall. Then the swimmer vigorously bends his legs at the hip joints, trying to touch his knees with his forehead. The pelvis and legs move towards the wall with increasing speed. Next, the pelvis follows the body under the water, the legs bend at the knee joints and are placed on the wall with acceleration. During rotation, the swimmer's arms, resting their palms on the water, help the movements of the legs and torso. When placing his feet on the wall of the pool, the athlete finds himself in a position on his side, with his arms pointing forward.

Rice. 24
Repulsion phase. Precise placement of the feet after the previous phase allows for a fairly good push-off. You begin pushing away from the wall with your legs while simultaneously stretching your body forward and turning it over to a position on your chest.
Sliding phaseAnd surface phase.
Technique for performing turns when swimming backstroke.
Until recently, backstroke swimming used two types of turns: a regular closed turn and an open flat turn.
The regular closed turn used to be one of the main turns for backstroke swimming. Let's consider its main phases (see Fig. 25).
Swimming and touching phase. A few meters before the wall of the pool, the swimmer decides which hand to touch and, accordingly, which direction to turn. The swimmer touches the wall of the pool with his hand at a depth of 30-40 cm. The wall is touched with the palm facing down opposite the shoulder of the opposite hand. Until you touch the wall, intense leg movements do not stop, and you take a breath. At the moment of contact, the shoulders and head drop under the water.
Rotation phase.The rotation is in the direction of the touching hand. The swimmer's head goes under the water, the hips and pelvis rise to the surface due to the arching of the back and lower back. The swimmer vigorously bends his legs, maintaining a high pelvic position, and with a swinging motion throws his legs out of the water onto the wall of the pool. Then the hand touching the wall is pushed off from it and, together with the other, is brought forward. And the legs are placed on the wall almost in the same place where the hand just touched it.
Repulsion phase. An energetic push-off is performed with the legs at an acute angle to the surface of the water. During the push and further sliding, the swimmer finally turns onto his back.
Sliding phaseAnd surface phase. The swimmer's movements during sliding and reaching the surface after a turn are similar to movements in similar phases when performing a backstroke start.

Fig.25
The open flat turn is easier to perform and is accessible to beginners. It begins and ends with the starting position on the back (see Fig. 26).
Swimming and touching phase. A few meters before the wall of the pool, the swimmer decides which hand to touch and, accordingly, which direction to turn. The swimmer touches the wall of the pool with his hand at a shallow depth of 15-20 cm.
Rotation phase.The rotation goes in the direction of the touching hand, i.e. when touching with the right hand, the rotation is performed in the right direction, when touching with the left - in the left. This is followed by the support part of the rotation phase, during which the swimmer turns 90°. The torque is created by supporting the hand on the wall (and therefore the first half of the rotation phase is called the support phase) and simultaneously raking the other hand in the water. During the rotation phase, the swimmer groups himself by strongly bending his legs at the knee joints. At the end of the support part of the rotation phase, the swimmer has a sufficiently high speed of rotation, which allows him to move to the next unsupported part of the phase, when the legs are placed on the wall for a push at a depth of approximately 40-45 cm. The hand that was rowing in the water is brought forward, and that , which was leaning against the wall, flies over the water.
Repulsion phase. In the take-off phase, the swimmer makes a powerful push with his legs, while simultaneously ensuring an optimally streamlined body position by extending his arms and positioning his head between them.
Sliding phaseAnd surface phase. The swimmer's movements during sliding and reaching the surface after a turn are similar to movements in similar phases when performing a freestyle start.

Fig.26
In 1991, new competition rules allowed the athlete to touch the wall of the pool with any part of his body during a turn while swimming on his back. Therefore, highly skilled swimmers began to use a forward somersault turn without touching the pool wall with their hand, but only with their feet placed on the wall to push off (see Fig. 27).
In other words, the swimmer turns on his chest before the turn and takes the starting position before the turn, as in the front crawl. All other actions have similar moments with a turn on the chest - somersault forward. The peculiarity is that when doing back crawl, after rotation and push, you need to get into a position on your back.
The technique for performing this turn consists of the following phases.
Swimming phase. Approaching the turning wall, the swimmer completes the stroke with one hand in a supine position and leaves it at the hip; then with the other hand he performs a long, energetic stroke up to the thigh while simultaneously turning onto his side (towards the rowing hand) and immediately onto his chest (Fig. 27a, 27b).
Rotation phase.After which the head sharply plunges under the water in a forward-downward direction, the body bends, the athlete performs a quick forward somersault, similar to what is done in a forward somersault when swimming front crawl (Fig. 27b, 27c, 27d, 27e).
Fig.27
Repulsion phase. After placing the legs with the feet on the wall, the swimmer finds himself in a position on his back, arms extended forward and instantly begins to push off from the wall (Fig. 27d, 27f).
The sliding phase and the surface phase. The athlete’s movements during sliding and reaching the surface (Fig. 27g, 27h) are in many ways similar to the movements in the same phases of movements when performing a start from the water on the back.
IN comprehensive In swimming, when transitioning from the butterfly method to the backstroke method and from the breaststroke method to the front crawl method, turns are used that are similar in the structure of movements to the “pendulum” type turn discussed above. When transitioning from the backstroke to the breaststroke, a somersault turn can be used.
In swimming technique, the main source of traction force is the hand stroke. At the same time, the traction force differs depending on the skill level of the athlete himself.
Phases included in the hand movement cycle:

—support (capture of the water surface). The hand makes a supporting, fairly powerful movement forward and downward with a bend at the elbow and a quick transition to the position that is necessary for the main stage of the stroke. The support phase should end with relatively rigid fixation of the joints and keeping the elbow above the hand;
— main part (pulling and pushing). It is carried out by adducting and extending the shoulder, at this time the arms also bend and extend in the elbow area. This stage involves creating the main traction that helps you move forward. To implement the main stage of the stroke, it is necessary to bend the arm at an angle of 90-100°, while the movement of the hand is carried out under the longitudinal axis of the body. At the moment when the stroke is made, it is necessary to close your fingers and open your palm. The initial stage of the stroke: the elbow is directed to the side and slightly back. Then the hand should be turned back at the elbow. Finish: pushing movements are performed from the water plane using the hand and forearm. This stage ends in the pelvic area;
—exit of the upper limb from the water plane. The movement should coincide with tilting to the other side. An elbow emerges above the water, then a hand emerging from the water in the thigh area behind the pelvis;
— movement with one hand over the water surface or carrying must be performed at the same time as the stroke of the other upper limb. Bend at the elbow, the relaxed arm quickly sweeps through and the movement accelerates before entering deep into the water. The palm is directed back and slightly upward when starting the carry;
— entry of the hand into the water plane and inflow. The hand goes forward and down. The horizontal speed must exceed the vertical speed. The entrance to the water plane is made where an imaginary point is located between the parallel through the shoulder joint and the longitudinal axis of the body. Entering the water is done with a brush, maintaining an acute angle. The hand at this moment is still bent and straightens only when there is an influx. The hand enters first, then the forearm and shoulder. Next, the relaxed arm should be extended forward. The hand should be turned vertically to the direction of movement at the end of the flow, and the arm should be bent at the elbow joint.
Before rowing on command "Oars" rowers should take the starting position: sit straight on the can, occupying 3/4 of its width, slightly bent legs should rest against the supports, hands bent at the elbows should be on the oar (one on the handle, the other on the shaft) chest width apart, palms down ( Fig. 32).
Rice. 32. Starting position for rowing (the blade is turned parallel to the surface of the water)
Proper positioning of rowers makes it easier to master rowing techniques and makes it possible to make full use of their physical strength. The stroke can be divided into four phases (Fig. 33):
a) Drifting of the oar blade towards the bow of the boat (1, 2).

Rice. 33. Turning the oar blade when rowing:
1 - starting position (by command “Oars”); 2 - at the beginning of a turn away from you; 3 - at the end of the turn and at the moment of entering the water; 4 - abeam; 5 - at the moment of removal from the water; 6 - when skidding
The oar blade moves through the air at the height of the gunwale, deployed parallel to the surface of the water to reduce air resistance and not touch the water.

Rice. 34. Oar skid
The rower's body leans forward, knees bend, arms straighten, head rises and turns towards the blade (Fig. 34).
At the end of the skid, by moving the hands away from you, the oar is turned so that the leading edge of the blade, having passed through the upper position, is inclined from the vertical plane towards the stern at an angle of 10-15°.
b) Inserting the blade into the water (3).
The blade is inserted into the water quickly and energetically, but without impact. The inclination of the upper edge towards the stern at an angle of 10-15° helps to keep the blade at the required depth. If the blade is inserted into the water vertically or with the upper edge turned towards the bow, then it can go too deep, turn into a horizontal position in the water and, slipping under the blades of other oars, slow down the rowing pace.
The sluggish, non-energetic immersion of the blade does not give a push to the boat and can even cause it to slow down if the speed of the oar is lower than the speed of the boat.
The depth of immersion of the blade in the water is of great importance. At first glance, it seems that the oar works most effectively when the entire blade is in the water. However, it is not. The blade is made somewhat longer in anticipation of rough seas, when it becomes more difficult to control the position of the oar. In calm water, the blade should be immersed in water to 1/2-2/3 of its length. When fully immersed, the rower is forced to exert more effort on the drive, as a result of which he gets tired faster. With less immersion, the working area of the blade decreases, and the oar will work ineffectively.
In practice, the depth of immersion of the blade depends on the training of the rower and on the sailing conditions (wind, waves). A trained rower sinks the blade more than a beginner. When moving with the wind, the blade plunges less than against the wind.
c) Driving the blade in the water. During navigation, the boat is given forward motion. Therefore, the drive is the main phase of the stroke and must be performed from beginning to end with maximum effort.
When starting the drive, the rower must firmly rest his feet on the stop and pull the oar with his entire body on straight arms. When wiring, the blade must be in a vertical position. The oar handle must be held at the same level, without losing the feeling of the oar's support on the water. Under this condition, the blade maintains a constant depth.
The main work during wiring is performed by the muscles of the legs and back. Straightened arms only transfer to the oar the force developed due to the movement of the body. The arm muscles are put into action when the body, having passed the vertical position, leans back. At this moment, the arms bend and forcefully pull the oar handle towards the body.
When pulling, the oar handle is grasped with four fingers from above and one (large) from below. Grasping the handle with your palm is completely unacceptable, since when pulling the oar, the skin of the palm gathers into folds and is easily abraded.

Rice. 35. Forces acting on a boat when rowing
The wiring must be long enough and carried out simultaneously by all oarsmen, which gives the boat uniform movement and ensures better results when crossing long distances.
With short strokes, the boat moves unevenly, jerkily, and the rowers quickly get tired. Frequent strokes (four to five strokes) with a slight skid of the oar are used at starts in boat competitions to give the boat the required initial speed.
However, you should not make excessively large drift of the blades and very long wiring. In Fig. 35 shows the forces acting on the boat when rowing. The water resistance force R acts on the hull and slows down the forward movement of the boat. The water reaction force P acts on the oar blade and is transmitted through the oarlocks to the boat hull. The force P can be decomposed into a traction force T, directed parallel to the center plane, which moves the boat forward, and a drift force D, directed perpendicular to the center plane, which does not participate in the movement of the boat. The T force is greatest when the blade is abeam. At this moment the force D is zero. When the blade is skidded at an angle of 45° from the beam, T = D, and when the blade is skidded to a larger angle, D>T, i.e., most of the rower’s efforts are wasted. Therefore, the angle of skidding of the oar and the end of the drive should be within 45-50°.
Of great importance is the simultaneity of the beginning and end of the rowing of both sides by the rowers. With non-simultaneous strokes under the influence of force D, the boat sways and yaws, which makes it difficult for the rowers to work and reduces the controllability and speed of the boat.
Simultaneous rowing is achieved:
Alignment of the rowers along the strokes;
Alignment of the left stroke - to the right;
Execution of commands (counting) by the foreman of the boat;
Thorough training of rowers.
d) Removing the blade from the water. To remove the blade from the water at the end of the drive, you need to complete the backward movement of the body, forcefully pull the oar towards the body and with a sharp downward movement of the hands, remove the blade from the water. Then the oar turns towards itself and the blade is in a horizontal position with the top edge towards the nose. You should not start turning the blade in the water due to its possible arbitrary deepening.
All phases of the stroke must follow one after another continuously, forming a complete closed cycle.
Proper breathing is important when rowing. When lifting the oar, you need to take a deep breath through your nose, and while pulling, exhale slowly through your mouth.
The rowing pace is set depending on the technical and physical training of the rowers. For a six-oar yawl, the normal rowing rate is 26-30 strokes per minute.
Rowing in wind and waves has its own characteristics. When moving in the wind, the stroke of the oar should be very strong and sharp, and the skid should be slow and smooth without turning the blade. When moving against the wind and waves, the boat loses speed immediately after the stroke, so the oars are brought in faster and pulled out more slowly.
Breaststroke is the most ancient sports style of swimming. Some historians believe that people knew how to swim breaststroke ten thousand years ago. Today, competitions in this style are held all over the world, which is why learning to swim breaststroke is popular. This style is included in the program of the largest championships, including the program of the Olympic Games. Women's and men's swimming in this style are performed separately at all competitions.
Interestingly, breaststroke is the slowest style, but at the same time, the most technically difficult. Therefore, before you start learning breaststroke swimming, it is necessary to properly study the theoretical part, which considers the technique of this style, the movement cycle in general and its phases in particular.
Breaststroke technique
Phase 1 – kick
Body position at the beginning of the movement: legs bent at the knees (shins perpendicular to the surface of the water, knees slightly wider than the pelvis, feet at the level of the buttocks and toes turned outward, the angle of hip flexion relative to the body is about 140°); the back is straight, the shoulder girdle is slightly higher than the pelvis (the angle of attack of the body is from 5-6 to 10-12°), the arms are in front with palms down and slightly bent at the elbow joints, the head is facing forward and down and partially immersed in the water.
Basic actions: the legs perform a kick (push-off), the arms are fully extended and sent forward, after the arms the head (face down forward) and shoulder girdle are immersed in the water, the body takes a horizontal and most streamlined position under water, breathing is held.
Target: begin to accelerate the body (increase the intra-cycle speed) by kicking and simultaneously sending the arms, head and shoulder girdle forward to begin the arm stroke.
Swimming technique:
While holding your breath, perform a sharp and powerful kick in arcs back-out-inside, fixing the pelvis and straight back. The blow must be explosive and sharp. During the strike, the arms are sent forward and extended to the point of failure. The head is removed between the hands. The body is given the most streamlined position under water. In this case, you need to try to glide along the surface of the water without diving deep (this is very important for proper swimming technique). During the impact, point your pelvis forward, hips up. At the end of the blow, do not plunge your feet deep. After completing the kick, relax your leg muscles.
Phase 2 – hand stroke
The body position at the beginning is the completion of leg extension at the knee joints.
Basic actions: the arms perform a stroke, the torso and legs maintain a well-streamlined and horizontal position; at the end of the stroke, the head turns to face forward, the shoulder girdle and head rise to the surface of the water; exhalation begins.
Target: increase the speed of progress to the maximum.
arms extended forward parallel to the surface of the water, hands palms down outward and almost touching, head between hands; legs relaxed and extended at the surface of the water; body in a horizontal position under water.
Technique:
Perform a powerful hand stroke with acceleration at the end, an optimal degree of bending of the arms at the elbow joints, a rational position for support on the water and a relatively rigid position of the hands and forearms.
Until the end of the stroke, keep your hips in a relaxed and streamlined position with your hands, keep your head lowered face down into the water (refrain from early raising your head face forward to inhale and early pulling your legs).
At the end of the stroke, exit the water and simultaneously send the head and shoulder girdle to slide forward and upward to inhale. The pelvis and hips should not drop down too much.
Start exhaling into the water calmly at first, then - at the very end of the stroke - accentuated through the mouth and nose.
Phase 3 – bringing your arms near your chest and inhaling
The body position at the beginning is the movement of the hands and elbows inward and forward.
Basic actions: the hands and forearms are brought together with a quick sliding movement inward and slightly upward - the hands are in front under the chin, the elbows are near the chest; the swimmer leans on the water with his hands, shoulder girdle and head up and forward (to the highest point of his trajectory above the surface of the water) and at the end of the phase begins to inhale; the legs bend smoothly at the knee joints, the hips maintain a well-streamlined position.
Target: maintain the forward speed at the highest possible level through the use of inertial forces and support movements of the hands and forearms.
Body position at the beginning of the phase: the arms are bent at the elbow joints, the elbows are approximately at the line of the shoulder girdle, the hands are below and slightly in front of the line of the shoulder girdle with the palms back (the hand and forearm are relatively rigidly fixed and form a single supporting plane); head turned to face forward; legs closed, relaxed and at the surface of the water; body at a minimum angle of attack to the surface of the water.
Technique:
Quickly and energetically bring the hands and forearms inward forward, continuing to rest your hands on the water and lifting the shoulder girdle and head up to inhale.
While bringing your hands together, rotate your hands and forearms inward and slightly upward, bringing your hands together, as if covering your elbows and shoulders with them from the oncoming flow of water. At the same time, do not press your elbows to your chest and do not stop the movement.
Continuing to move your chin and shoulder girdle forward, inhale quickly. During inhalation, the movement does not stop and remains smooth.
Begin smooth bending of relaxed legs at the knee joints, maintaining a high and streamlined position of the hips.
Avoid excessive upward movement of the shoulder girdle, leading to an increase in the angle of attack of the body (the angle of attack should not exceed 12-15°).
Phase 4 – raising the arms and bending the legs
The body position at the beginning is extension of the arms at the elbow joints.
Basic actions: hands are moved forward under water or on the surface of the water with minimal counter resistance; the legs perform the main part of the pull-up - flexion at the hip and knee joints; the head and shoulder girdle follow forward and slightly downward after the arms, leveling the position of the body and reducing its angle of attack; The head begins to plunge face first into the water.
Target: Lose forward momentum as little as possible and complete preparation for effectively performing the breaststroke kick in a new cycle of movements.
Body position at the beginning of the phase: arms bent at the elbow joints, elbows near the chest, hands together and under the chin in front of the elbows (as if covering them and the shoulders from the oncoming flow); legs slightly bent at the knee joints, knees approximately hip-width apart, heels of the feet near the surface of the water, hips in a well-streamlined position; the shoulder girdle and head are near the surface of the water (the angle of attack of the body can reach 12-15°), the swimmer looks forward.
Technique:
Finish inhaling and hold your breath.
Smoothly and quickly bring your arms forward, energetically send your head and shoulder girdle after them; towards the end of the withdrawal, turn your hands palms down.
Combine the extension of the arms with simultaneous bending of the legs at the knee and hip joints and bring the shins and feet to the starting position for the impact (perpendicular to the surface of the water).
Pull up the legs with acceleration until the feet instantly turn with their toes outward; at the same moment, vigorously spread your knees to the width necessary to begin kicking backwards.
Continue moving forward and slightly downward following your arms, straightening your torso, maintaining a straight back and slightly lifting your pelvis towards the start of the back kick.
The cycle of movements is completed.
It must be borne in mind that in breaststroke the swimmer receives approximately 70% of the forward momentum through leg movements.
If you want to master this complex and beautiful style, then come to our club. Experienced instructors will help you understand how learn to swim breaststroke, will give practical advice and conduct a set of effective lessons, after which you will learn to swim perfectly in this style.
How to swim crawl?
The off-season is the perfect time to work on your technique. Whether you're planning on taking a short break after a long, challenging season, or you're already training hard in preparation for the next one, you'll definitely want to work on the following elements - as the list provides a list of tips to help you improve your swimming technique crawl, making your swimming more efficient.
I agree that even the best coaches in the world are unlikely to be able to create a single comprehensive list of technique guidelines that will guarantee you unconditional success, but the 10 tips below include all the basic elements that you should always keep in mind when swimming freestyle (or whatever it is called). also popularly called rabbit). With a certain amount of effort and, perhaps, with a couple of tips from an experienced instructor or fellow swimmer, following these 10 tips will allow you to know by heart all the basic tricks of the ideal crawl technique. It is possible that you already own a couple of them, or perhaps you are just learning to swim properly. Either way, there's no better time to get started with your technique than right now. I advise you to take one technical element per week and give it your full attention in each training session. Having studied one technical element, move on to the next, but do not forget about what you previously learned. Thus, in ten weeks you will not only achieve a significant improvement in your own swimming technique, but also gradually stop constantly thinking about how you swim, since the entire base will be developed gradually over several months, bringing it to automaticity. Instead of overloading yourself with a thousand different little things and aspects at once, you will consistently work on your technical base, adding more and more new parts over and over again.
1. Head position in freestyle swimming.
Body position in the water is perhaps the most important aspect of effective swimming; and the position of your head determines exactly how your body lies in the water. Look straight ahead, so that the edge of the swimming cap is just below the surface of the water. The neck and upper back muscles should be relaxed, giving the body a maximally extended position, parallel to the bottom of the pool; The head itself should be tilted forward at an angle of no more than 45 degrees. If you press your head too hard against your chest, you will create additional resistance from the water and it will become much more difficult to move. This mistake will also radically change the position of the entire body, drowning the torso and sinking the hips. Accordingly, if you raise your head too high, the head will again create additional resistance, and the muscles of the neck and upper back will soon experience overstrain, causing additional fatigue and discomfort.
2. Reach forward when swimming crawl.
During each stroke, try to extend your arm forward to its maximum length. Many inexperienced swimmers begin the catch by placing their hand in the water directly in front of their head. There is no need to do this! Concentrate on getting your hand to touch the water about 30-40cm from your head, and then extend it about 10-15cm further by straightening your shoulder. This short movement involving the shoulder joint (imagine standing and trying to reach a high ceiling) will help make your stroke longer and smoother, as well as maximize your grip on the water.
3. Rotation of the body when swimming crawl.
Torso rotation is closely related to the mechanics of sequential forward movement; By alternately rotating the body around the axis, you promote the movement of the shoulder forward at the end of each stroke. When your right arm is fully extended, reaching forward (and your left arm is almost out of the water to begin the next stroke), your body should rotate to the right. This means that the entire right side of your torso should be completely submerged in the water and facing the bottom of the pool, while the entire left side should be completely facing the ceiling. With the next stroke, your torso rotates to the left, changing its position by 120 degrees. Imagine a grilled chicken rotating on a sword not in a circle, but back and forth, this is exactly how your torso should work during each new stroke.
4. "Eights".
Consistently moving forward, you pull your body up with your arms, trying to grab as much water as possible. Everyone knows that the shortest distance between two points is a straight line, but in swimming, the last thing you want to do is perform an arm stroke in a straight line (it's difficult and ineffective). Instead, when swimming freestyle, try moving your hand in a line that resembles the letter S (a slightly longer way to complete the stroke); Both hands should move so that their trajectories together resemble a figure eight or an hourglass silhouette (8). At the beginning of the stroke, the arm is extended forward, away from the body. At this moment, keep your elbow high. As soon as you grab the water with your palm, move your hand back to your body, in a curve, towards the navel; then pull it to your thigh and take it out of the water again.
5. Finish the stroke.
When your hand finishes drawing a figure eight underwater, it should extend along your torso behind you; so that the thumb is opposite the buttock along the line of the swimming trunks. Towards the end of the stroke, many swimmers also begin to bend their elbow and lift their arm out of the water without completing the stroke. There is no need to do this! By shortening the stroke, the swimmer not only begins to move more slowly, but also wastes a large amount of useful energy by making more strokes per pool (essentially skidding in place).
6. Sprinting, fluttering footwork when swimming crawl.
Performing kicks is extremely energy-consuming, especially in relation to the last sections of the swim distance (especially long ones). Correct and powerful kicking is of great importance in sprinting, but regardless of your specialization, kicking technique is simply necessary to know and perform correctly - as it is one of the foundations of effective and fast swimming. Too often, swimmers themselves create water resistance by using their legs incorrectly and reducing their own speed significantly. Fluttering kicking footwork is a fast, powerful up-and-down movement of both legs. If possible, try to create as little foam as possible by keeping your feet below the surface of the water (not too deep). The legs should change position depending on the tilt of the body during axial rotation. Be careful not to let your legs swing in different directions as you rotate your torso. Keep your feet together, in line with the rest of your body, and don't let them go beyond the horizontal line of your shoulders and head (imagine floating through a hole in a car tire, keep your feet close together so as not to touch the inside edges of the hole).
7. Stayer's cross-footwork when swimming crawl.
Stayer kicking differs from sprinting in that it is aimed, rather, not at developing a high speed of movement, but at maintaining the chosen rhythm. In swims of half a kilometer or more, it is best to use cross kicks, where you cross your ankles each stroke (or through each stroke). Cross kicks come naturally to some swimmers, while for others they are very difficult. Try both techniques and see how you feel. Remember that cross kicks are less energy intensive and very useful at long and ultra-long distances, but they do little to help you gain speed quickly.
8. Head position during inhalation when swimming crawl.
When turning your head to inhale, make sure that its tilt does not exceed 90 degrees. The mistake many swimmers make is that they turn their head at an angle of more than 100 degrees, showing almost their entire face (both eyes) above the surface of the water. You need to learn to keep your head parallel to the surface of the water so that one eye is above the surface and the other below it. There is no need to turn the head deeper; In addition, it will require much more effort from you and will increase water resistance, destabilizing the position of the torso. Also, under no circumstances raise your head forward, as some beginners do. The only case when this is worth doing is water polo crawl, partly used in open water swims for spatial orientation. In all other cases, your swimming will be similar to driving a car with an anchor attached to the bumper)
9. Breathing patterns when swimming crawl.
Of course, it is best to inhale on both sides (bilateral breathing). It does not interfere with the stroke and helps maintain a balanced body position. Swimmers who only breathe on one side risk developing the bad habit of making uneven, one-sided strokes, and during competition, bilateral breathing helps keep track of opponents on either side of you. In open water, bilateral breathing will allow you to swim straight; inhaling to one side, you will swim in an arc, bevelling the trajectory of movement to the left or right. Force yourself to inhale on both sides. This will give you complete benefits!
10. Starts and finishes when swimming crawl.
Most athletes neglect the importance of start and finish. Even as you push off the board for the next rep, try to keep your body as streamlined as possible, placing your arms outstretched above your head in a V shape. Finish each rep with several powerful strokes, accelerating towards the board rather than stopping, drifting by inertia with your head above the surface. Be a perfectionist in everything, pay attention to your every move. Remember that we learn with every repetition, and if you start and finish poorly in training, it will sooner or later carry over to competition. Above all, remember that the more streamlined your body position is when pushing off the side, the more you will glide and the less you will have to swim!
The article was prepared and translated by the website using materials from the resource: www.active.com
Thanks for the photo: TYR
Buy high-quality swimming products in Swimlike stores in Russia and in the online store with fast delivery (1-10) days throughout Russia and the CIS!
Sign up for the Swimlike proper swimming school for adults in Moscow and St. Petersburg on the website: